Build a Blog with MDX and Next.js

Since the arrival of MDX, there's been a lot of excitement in the React developer community and the potential use cases for it, most notably, for things like building a blog. If you've been thinking about building a blog with MDX, you may be also considering which technology stack to use.
After some careful consideration myself, I found that building a blog with the Next.js framework had great built-in support for MDX. It also has the capability to support any future directions a blog might need to go.
In this guide, you'll find everything you need to know to build a successful blog with MDX and Next.js, including:
- How to build a blog using Next and MDX
- Build a blog post card listing page
- How to theme and style using CSS and TailwindCSS
- How to use Front Matter in your blog
- SEO optimization for blog pages
- Static Site Generation (SSG)
Here's a previous in-depth article on Getting started with MDX on Next.js if your just getting started with MDX and Next.js.
This article will focus primarily on using remote MDX to build blog pages with MDX.
What is an MDX blog?
MDX is a great way to combine standard HTML Markdown and React JSX components within the same page content.
This gives the ability to create more robust and interactive page content while also keeping Markup simple and easy to read and edit.
Why is MDX important for blogs?
Blogs have become one of the primary ways to generate organic traffic to your site. Creating highly SEO optimized blog pages can have a tremendous impact on your page ranking.
MDX can also be used in areas like:
- Product marketing
- Marketing campaigns
- Landing pages
- Sales presentations
- And other forms of commercial presentation.
Imagine being able to easily embed some sales or marketing campaign banners and charts into an easy to maintain Markdown page.
Why use Next.js for blogs?
The Next.js framework eliminates the need for tons of boilerplate code to get up and running quickly and is fully optimized for rapid development and versatility.
The other benefits include:
- Static Site Generation (SSG), allowing for pure HTML rendered pages.
- Server Side Rendering (SSR), using advanced forms of React Server Components (RSC).
- API built-in support, if your blog should need to access external resources.
- Dynamic Routing using the
app router, which can makes creating pages much easier.
- Authentication and Authorization if this is eventually needed.
Getting started building a blog
If you don't already have a Next.js application set up, you can easily create one to follow along with these examples.
npx create-next-app@latest
You will see some options when creating the app. I recommend using TailwindCSS which is what I'll be using for this article.
Next, I'll be installing the following pacakges which I'll be using in the article.
npm install next-mdx-remote globby moment @tailwindcss/typography
A few blog building tips
Before we get started, here's some key things I've learned when building blogs that can really improve the process:
- Use a
lib directory for config, utilities, services and other non-UI code.
- Use a
components directory for any custom UI components.
- Try to keep any custom components as leaf (a.k.a dumb components) components and pass the data they need as props rather than using
fetch inside them.
- Keep a common content location under your project root, for example
/content and then use sub-directories for more specific content, like /content/blog/sports or /content/blog/finance.
Also, for this article, I will use the default path alias conventions using Typescript defined in the tsconfig.json file.
tsconfig
{
  "compilerOptions": {
    "paths": {
        "@/*": [
          "./*"
        ]
    }
  }
}
Simple Blog demo
For this article I'll be creating a simple blog that talks about food related topics and will include the following pages and components:
- Blog grid: This page will list all of the available posts as cards in a grid column format. This page will show single column for mobile and three columns on medium size screens.
- Blog detail: This page will display the page MDX Markdown and any Front Matter associated with this post.
- Blog header: A reusable blog header that will display any Front Matter with title.
- Blog card: A reusable blog card that will be used in the grid view to list any posts and display any Front Matter with title, author and published date.
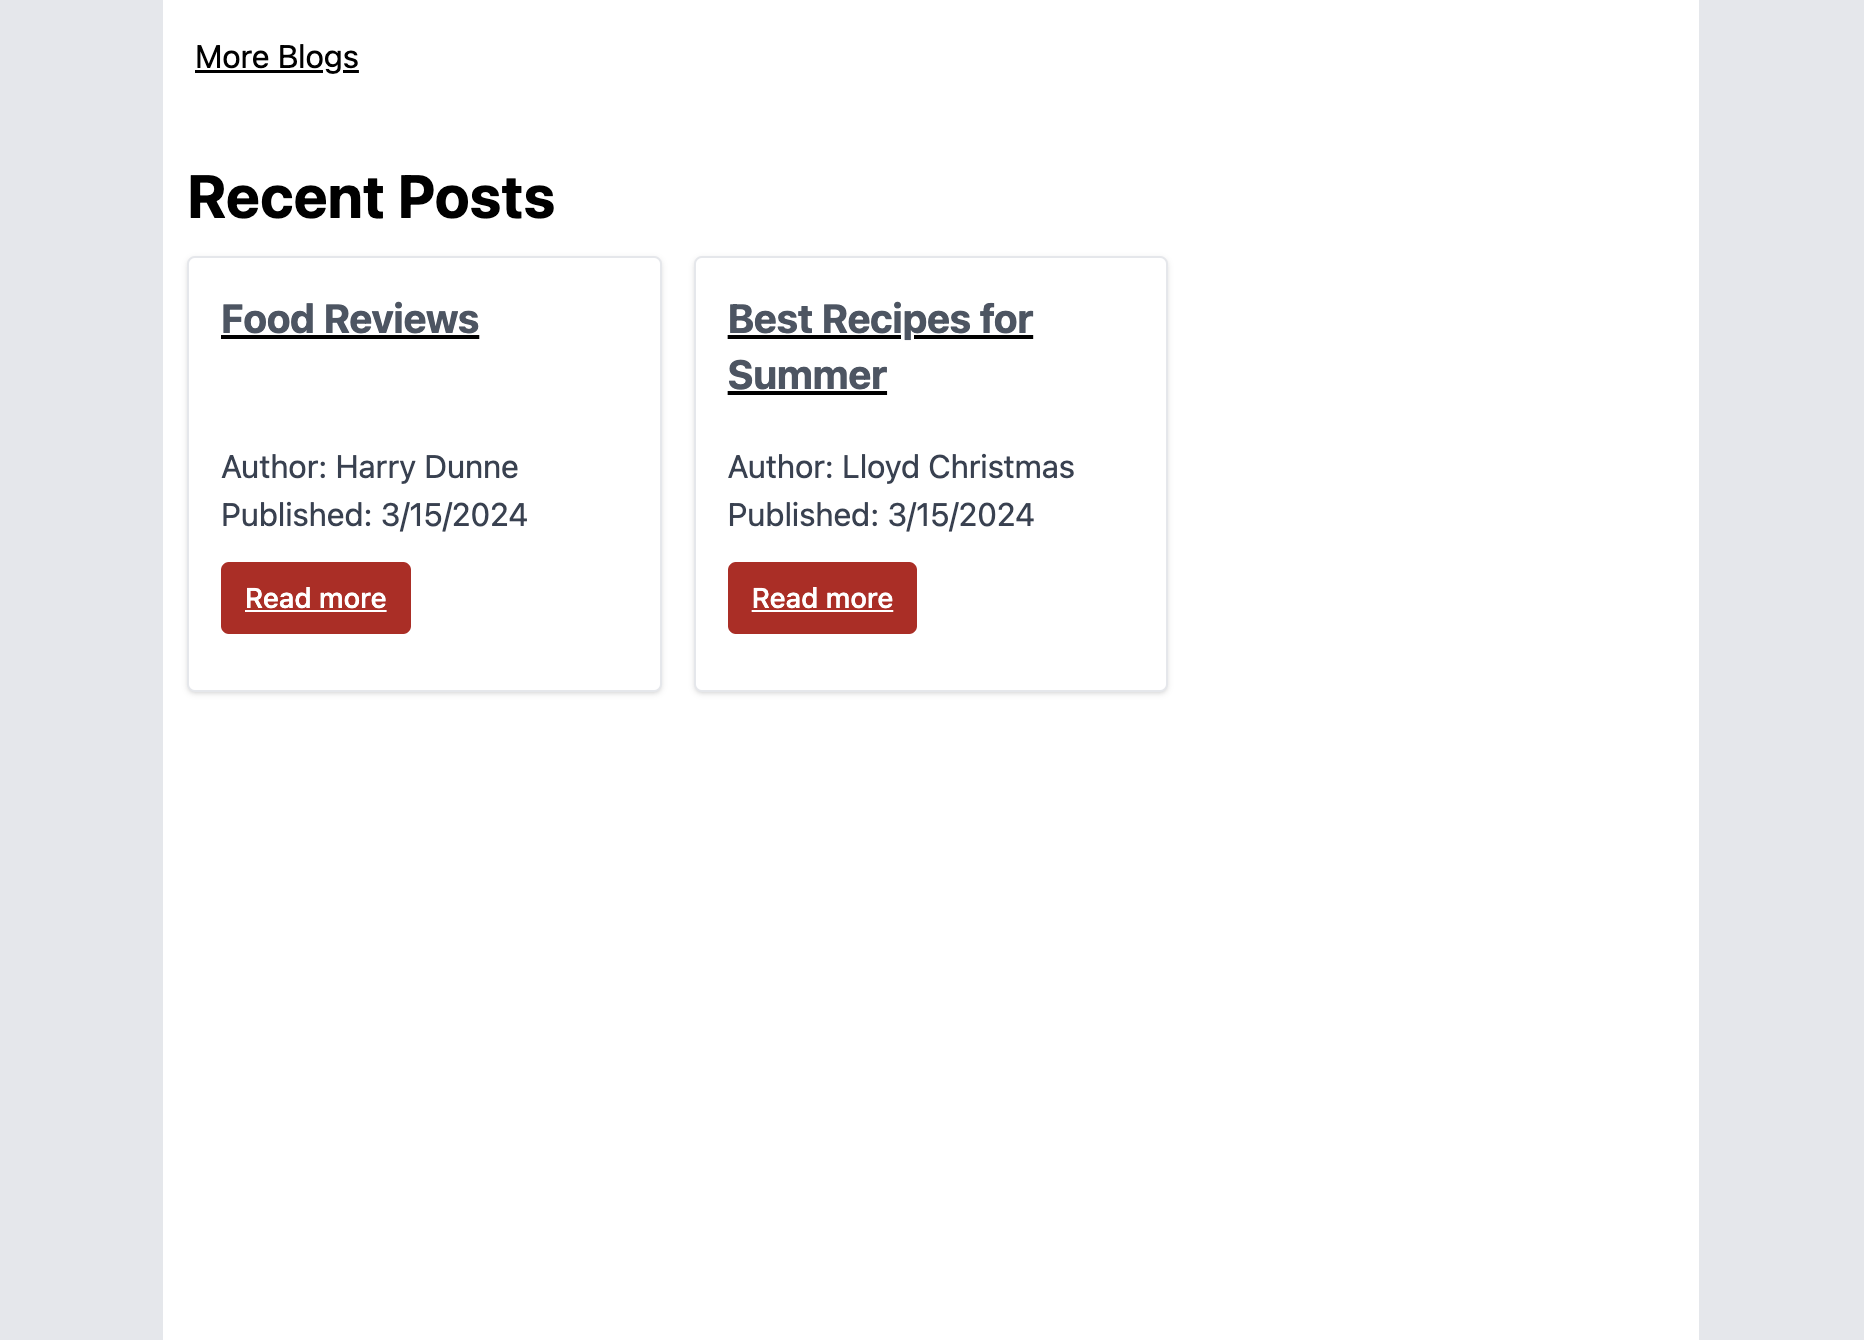
Blog grid listing page
Blog detail page
Blog project structure
Here's the outline of the project structure we'll use to build this blog.
 your-project
  ├── app
  │   ├── blog
  │   │   ├── [slug]
  │   │   │   └── page.tsx
  │   │   ├── layout.tsx
  │   │   └── page.tsx
  │   └── layout.tsx (root layout)
  ├── lib
  │   └── mdx
  │       ├── config.ts
  │       └── types.ts
  ├── components
  │   ├── markdown.tsx
  │   ├── card.tsx
  │   └── header.tsx
  └── content
      └── blog
          └── food
              ├── recipes
              │   └── best-summer-recipes.mdx
              └── food-reviews.mdx
Blog project code
Here's all of the code for the blog. I'll annotate some of the key points for these code blocks.
Let's start with the two app router pages, which will share a layout.tsx.
- /blog - routes to the blog grid card listing page.
- /blog/[slug] - routes to the actual blog post by
slug name.
Using slugs will have SEO benefits and will also help visitors decide whether to click on a link. Make your slug names readable and a preview of what the link contains.
Bad: /blog/food-details
Good: /blog/top-food-reviews
Good: /blog/top-food-reviews-in-california
Root layout
import type { Metadata } from "next";
import { Inter } from "next/font/google";
import "./globals.css";

const inter = Inter({ subsets: ["latin"] });

export const metadata: Metadata = {
  title: "Blog",
  description: "Blog demo application",
};

export default function RootLayout({
  children,
}: Readonly<{
  children: React.ReactNode;
}>) {
  return (
    <html lang="en">
      <body className={inter.className}>{children}</body>
    </html>
  );
}
Let's start with the root layout.tsx which should already be generated and just set the header details to the following.
Blog layout
posts layout
import React, { PropsWithChildren } from 'react';

export default function PostsLayout({ children }: PropsWithChildren) {
  return (
    <div className="bg-gray-200">
      <div className="md:container md:mx-auto h-screen bg-white">
        {children}
      </div>
    </div>
  );
}
Blog grid listing page
import fs from 'fs';
import path from 'path';
import { globbySync } from 'globby';
import { compileMDX } from 'next-mdx-remote/rsc';
import { Blog } from '@/lib/mdx/types';
import BlogCard from '@/components/blog/card';

const blogsDir = path.join(process.cwd(), 'content', 'blog');

const allPosts = globbySync(`${blogsDir}/**/*.mdx`);

const publishedFilter = (post: Blog) => post.published && !post.draft;

const getPosts = async () => {
  const posts = [];

  for (const file of allPosts) {
    const fileContent = fs.readFileSync(file, { encoding: 'utf8' });
    const { frontmatter } = await compileMDX({
      source: fileContent,
      options: {
        parseFrontmatter: true,
      },
    });
    posts.push(frontmatter as Blog);
  }
  return posts.filter(publishedFilter);
};

async function Posts() {
  const posts = await getPosts();

  return (
    <div className="p-3">
      <h1 className="my-3">Recent Posts</h1>
      <div className="grid grid-cols-1 md:grid-cols-3 gap-4 mt-3">
        {posts && posts.map((post: Blog) => {
          return <BlogCard key={post.slug} {...post} />;
        })}
      </div>
    </div>
  );
}

export default Posts;
This page displays a grid listing of blog posts using cards and does the following:
- Finds all the MDX files under the
/content/blog directory using a glob pattern matcher.
- Parses each file and extracts the
frontmatter content object using the compileMDX from the next-mdx-remote/rsc.
- Creates an array and then filters it based on
published and draft status.
The next-mdx-remote/rsc modules are specifically for compliling using React Server Components (RSC). Since Next.js 13, all modules are by default server side rendered. In this example all of the blog pages are fully rendered as RSC.
Blog card
import Link from 'next/link';
import { Blog } from '@/lib/mdx/types';
import moment from 'moment';

function BlogCard({ title, slug, author, date }: Blog) {
  const publishedDate = moment(date).format('M/D/YYYY');

  return (
    <div className="flex flex-col justify-between p-4 bg-white border border-gray-200 shadow rounded">
      <Link href={`/blog/${slug}`}>
        <h3 className="mb-2 font-bold text-gray-600">{title}</h3>
      </Link>
      <div className="mb-3 font-normal text-gray-700">
        <div className="flex flex-col text-normal py-3">
          <p>Author: {author}</p>
          <p>Published: {publishedDate}</p>
        </div>
        <Link
          href={`/blog/${slug}`}
          className="inline-flex items-center px-3 py-2 text-sm font-medium text-center text-white bg-red-700 rounded focus:outline-none"
        >
          Read more
        </Link>
      </div>
    </div>
  );
}

export default BlogCard;
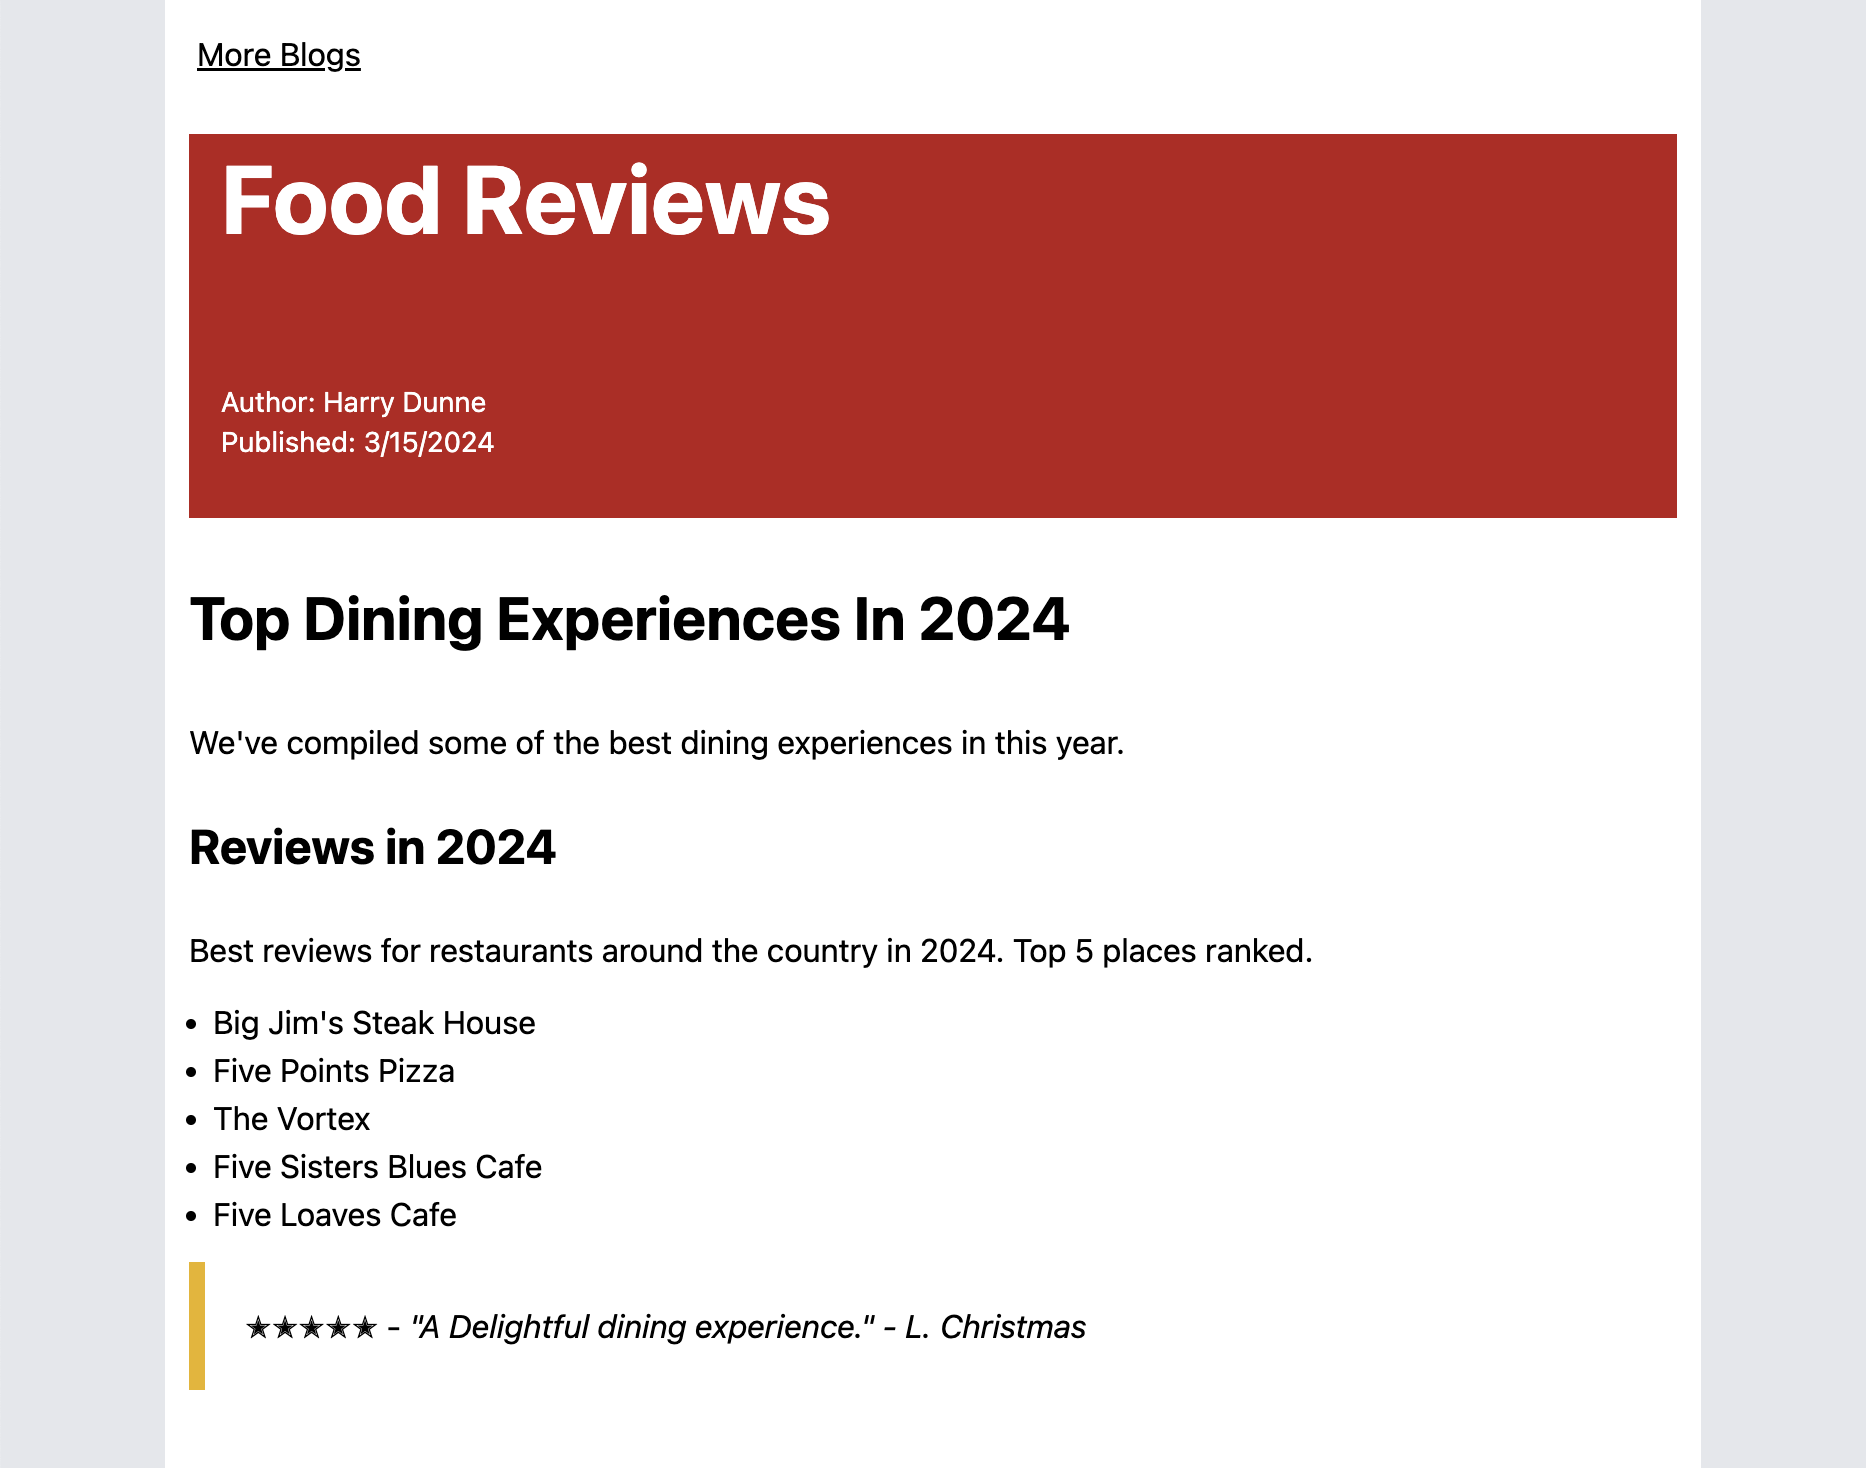
Blog Detail page
import fs from 'fs';
import path from 'path';
import { globbySync } from 'globby';
import { MDXRemote, MDXRemoteProps } from 'next-mdx-remote/rsc';
import {defaultMdxOptions} from '@/lib/mdx/config';

import Link from 'next/link';

const blogsDir = path.join(process.cwd(), 'content', 'blog');

type Props = {
  params: {
    slug: string;
  };
};

async function BlogPage({ params: { slug } }: Props) {
  const getDocumentBySlug = (slug: string): string => {
    const files = globbySync(`${blogsDir}/**/${slug}.mdx`);
    if (files.length === 0) {
      return '';
    }
    const fileContent = fs.readFileSync(files[0], { encoding: 'utf8' });
    return fileContent;
  };

  const NotFound = ({ slug }: { slug: string }) => {
    return (
      <div
        className="bg-yellow-100 border-l-4 border-yellow-500 text-yellow-700 p-4"
        role="alert"
      >
        <p className="font-bold">Not found</p>
        <p>
          Ooops... the blog post <i>{slug}</i> was not found{' '}
        </p>
      </div>
    );
  };

  const blogContent = getDocumentBySlug(slug);

  const mdxRemoteOptions: MDXRemoteProps = {
    ...defaultMdxOptions,
    source: blogContent,
  };

  return (
    <div>
      <div className="p-4">
        <Link href="/blog">More Blogs</Link>
      </div>
      <div className="prose p-3">
        {!blogContent ? (
          <NotFound slug={slug} />
        ) : (
          <MDXRemote {...mdxRemoteOptions}></MDXRemote>
        )}
      </div>
    </div>
  );
}

export default BlogPage;
Let's break this page down, since there's a lot happening here.
This is a dynamic route page where all of the blog post content is loaded by the slug param and displayed and does the following:
- Gets the
slug from the params prop.
- Finds the MDX file using a
glob pattern by slug and takes the first array index.
- Creates an options object using the
MDXRemoteProps options.
- Adds the options object as props for the
<MDXRemote> which basically calls compileMDX behind the scenes and then renders the MDX serialized content as HTML.
The mdxRemoteOptions derives its defaults from a config object located in the lib directory but can be overriden here if needed.
Here's a quick breakdown on the available options object:
scope - Pass in any variables and reference them in MDX using {myVariable} expression.source - MDX content string from the file.components - Adds two components BlogHeader and Markdown.parseFrontmatter - Signals to parse the Front Matter meta data, otherwise meta data will be rendered as plain text.mdxOptions - Add any available Remark or Rehype plugins to transform and enhance your MDX Markdown content.
remarkPlugins - Any ESM module type plugins from Remark. Remark PluginsrehypePlugins - Any ESM module type plugins from Rehype. Rehype Plugins
Since TailwindCSS omits base styles for most HTML elements, it comes with the prose typography plugin from @tailwind/typography to wrap any section of content with great styles.
You may have noticed that I wrapped all of the MDX content insided the prose class wrapper to apply these styles.
To add the prose typography, you'll need to add the following plugin to your tailwind.config.ts.
tailwind config
import typographyPlugin from '@tailwindcss/typography';
const config: Config = {
plugins: [
typographyPlugin
]
};
export default config;
MDX Remote Options Config
import { MDXRemoteProps } from 'next-mdx-remote/rsc';
import remarkFrontmatter from 'remark-frontmatter';
import remarkMdxFrontmatter from 'remark-mdx-frontmatter';
import BlogHeader from '@/components/blog/header';
import Markdown from '@/components/blog/markdown';

const remarkPlugins: any[] = [remarkFrontmatter, remarkMdxFrontmatter];

const rehypePlugins: any[] = [];

export const defaultMdxOptions: MDXRemoteProps = {
  source: '',
  options: {
    parseFrontmatter: true,
    scope: {},
    mdxOptions: {
      remarkPlugins: remarkPlugins,
      rehypePlugins: rehypePlugins,
      format: 'mdx',
    },
  },
  components: {
    ...Markdown,
    Header: BlogHeader,
  },
};
Markdown components
import React from 'react';

const Markdown = {
  h1: ({ children, ...props }: React.ComponentPropsWithoutRef<'h1'>) => {
    return (
      <h1 {...props} className="my-8">
        {children}
      </h1>
    );
  },
  h2: ({ children, ...props }: React.ComponentPropsWithoutRef<'h2'>) => {
    return (
      <h2 {...props} className="my-6">
        {children}
      </h2>
    );
  },
  h3: ({ children, ...props }: React.ComponentPropsWithoutRef<'h3'>) => {
    return (
      <h2 {...props} className="my-5">
        {children}
      </h2>
    );
  },
  h4: ({ children, ...props }: React.ComponentPropsWithoutRef<'h4'>) => {
    return (
      <h4 {...props} className="my-4">
        {children}
      </h4>
    );
  },
  h5: ({ children, ...props }: React.ComponentPropsWithoutRef<'h5'>) => {
    return (
      <h5 {...props} className="my-3">
        {children}
      </h5>
    );
  },
  blockquote: ({ children, ...props }: React.ComponentPropsWithoutRef<'blockquote'>) => {
    return (
      <blockquote {...props} className="border-yellow-500 border-l-8 p-5">
        {children}
      </blockquote>
    );
  },
};

export default Markdown;
This page puts all of the HTML element components in a Markdown component and spreads the values in the options.
These HTML component definitions are completely optional. The prose class will provide a good amount of styles but occasionally you may want to customize the theme.
Blog types
export type Blog = {
  title?: string;
  description?: string;
  author?: string;
  slug?: string;
  tags?: string[];
  keywords?: string[];
  categories?: string[];
  date?: string;
  draft?: boolean;
  published?: boolean;
};
Here's the Blog TypeScript type that will define the Front Matter structure. This will provide some intellesence when destructuring the frontmatter object.
import { Blog } from '@/lib/mdx/types';
import moment from 'moment';

function BlogHeader({ title, author, date }: Blog) {

  const publishedDate = moment(date).format('M/D/YYYY');
  return (
    <div>
      <div className="flex flex-col justify-between text-white bg-red-700 p-4 h-48">
        <h1 className="text-5xl text-inherit font-bold leading-8">{title}</h1>
        <div className="flex flex-col text-sm">
          <p className="my-2">Author: {author}</p>
          <p className="my-2">Published: {publishedDate}</p>
        </div>
      </div>
    </div>
  );
}

export default BlogHeader;
This will be the only custom MDX component for this demo but it will demonstrate how to access and use the frontmatter object that's available in the MDX scope.
This component accepts a Blog type as props, so we'll be able to spread the frontmatter object as props and show the author and published date.
MDX content pages
And finally, here's the MDX sample blog post content that requires .mdx extension for each of the MDX post pages under the /content/blog directory.
One thing to note is that the file name must match the slug key in the Front Matter meta info without the extension.
Also, the Front Matter needs to be at the top of the page and between the --- open and close delimiter section.
---
title: Food Reviews
description: Food reiews for the year.
authors: Harry Dunne
date: 2024-03-15T07:52:57.880Z
slug: food-reviews
published: true
draft: false
tags:
- Dining Review 2024
keywords:
- Top Food Reviews
- Food 2024
categories:
- Food Reviews
---
<Header {...frontmatter} />
# Top Dining Experiences In 2024
We've compiled some of the best dining experiences in this year.
## Reviews in 2024
Best reviews for restaurants around the country in 2024. Top 5 places ranked.
- Big Jim's Steak House
- Five Points Pizza
- The Vortex
- Five Sisters Blues Cafe
- Five Loaves Cafe
> ✭✭✭✭✭ - *"A Delightful dining experience." - L. Christmas*
<br/>
<br/>
---
title: Best Recipes for Summer
description: Best recipes for summer picnics and outings
authors: Lloyd Christmas
date: 2024-03-15T07:52:57.880Z
slug: best-summer-recipes
published: true
draft: false
tags:
 - BBQ
keywords:
 - Top BBQ
 - Best Ribs
categories:
 - Summer Recipes
---

<Header {...frontmatter} />

# Top BBQ and Grill Ideas for Summer

We've selected some of the best BBQ and grilling ideas for summer.

## 5 Tasty BBQ Ideas

- Shortcut BBQ Ideas
- BBQ and pulled pork
- Texas Brisket
- Rib dry rub
- Tri-tip plates
Running the blog
At this stage when all of the code is added to the project, you'll be able to run the blog demo by starting the dev server.
npm run dev
Point a browser to localhost:3000/blog and you'll see the blog grid listing.
So now that we have a basic blog set up, next we'll take a look at how to optimize this blog application.
So far all of the pages and code are completely server side rendered (SSR) since all of the code modules are using RSC by default.
This means that everything is compiled completely on the server before it's sent to the browser.
To eliminate the compile step and full pre-render these blog pages as pure static HTML, we'll need to use a process called static site generation (SSG)
Static site generation (SSG)
Since we're using a dynamic [slug] param in the route. we need to know all of the slug params ahead of time in order to pre-render these pages.
In Next.js 13 and higher, they solve this problem by providing the generateStaticParams function which will be called during the build process.
This function should return a list of all of the blog post slug params.
Step 1
Let's add the following function to the /app/blog/[slug]/page.tsx page we defined earlier.
export function generateStaticParams() {
  const allPostsParams = globbySync(`${blogsDir}/**/*.mdx`).map((file) => {
    const fileName = file.slice(file.lastIndexOf('/') + 1);
    const slug = fileName.replace(/\.mdx$/, '');
    return slug;
  });
  const staticParams = allPostsParams.map((slug) => ({
    slug,
  }));
  return staticParams;
}
This function does the following:
- Finds all of the files with the
.mdx extension under the /content/blog directory.
- Creates an array of
slug names.
- Maps the array of
slug names to an array of params.
  return [
    {
      slug: "best-summer-recipes"
    },
    {
      slug: "food-reviews"
    }
  ]
Each of the param objects in the returned array will be used to generate each blog post page during the build step. The content will be statically generated as HTML.
Step 2
Now run the build command.
npm run build
You will see the following terminal output showing that all of the slugs we're generated successfully. This is indicated by the solid circle ● (SSG).
Route (app)                              Size     First Load JS
┌ ○ /                                    142 B          84.4 kB
├ ○ /_not-found                          881 B          85.2 kB
├ ○ /blog                                177 B          91.2 kB
└ ● /blog/[slug]                         177 B          91.2 kB
    ├ /blog/food-reviews
    └ /blog/best-summer-recipes
+ First Load JS shared by all            84.3 kB
  ├ chunks/1dd3208c-f9971ff387577daf.js  53.4 kB
  ├ chunks/997-8593090b208bf1ae.js       29 kB
  └ other shared chunks (total)          1.87 kB


○  (Static)  prerendered as static content
●  (SSG)     prerendered as static HTML (uses getStaticProps)
Step 3
Now that we built the static bundle, we can test the performance out by starting the Next.js server in production mode.
npm run start
Point a browser to localhost:3000/blog and browse all of the blog posts and they will load very quickly since it's all pure html.
This is a very important factor in SEO optimization as search engines will consider response time as a ranking factor.
Conclusion
By now you should have a good understanding of how to build a basic blog with MDX using Next.js.
The next-mdx-remote package is very flexible and can be used to load content from virtually anywhere.
There's some pretty good extensions in Visual Studio Code for working with Front Matter. I think it compliments MDX nicely without the need for a database or external CMS. You can always move in that direction over time.
Hope this article helps. Good luck on your blogging!