Getting Started with Drizzle ORM on Next.js
Posted on: August 11 2024

There is no doubt that Drizzle ORM is quickly becoming one of the top ORM tools for accessing databases and is quickly becoming a great fit for Next.js
Drizzle brings a simplified SQL like ORM approach to relational databases and is serverless and edge ready which aligns with Next.js hosting strategies.
In this article I'll take a step by step approach to getting started building a Next.js app using Drizzle ORM, including:
- What is Drizzle ORM and why it's important?
- How Drizzle compares to other ORM tools.
- How to setup a Next.js app with Drizzle ORM.
- Build a student enrollment type database with Drizzle.
- Drizzle kit lifecycle commands.
- Drizzle Studio usage.
- Best practices for using Drizzle ORM.
After converting several apps over to use Drizzle ORM, there are a few things I've learned along the way that can help anyone starting out.
On that note, let's get started with Drizzle!
What is Drizzle ORM?
In short, Drizzle ORM is really not much different than any ORM before it but where it sets itself apart is in the following areas:
- Relational database ORM.
- A zero dependency, 31KB zipped footprint.
- Full TypeScript support without over complexity.
- Consistent SQL like command syntax.
- Flexible and extensive schema configuration.
- Supports migrations and introspection.
Why is Drizzle ORM important?
In my experience, Drizzle has solved some of the biggest hurdles in using ORM tools I've faced over the years. including:
- Schema configuration is extremely flexible and can be separtated into many files.
- TypeScript types are more intuitive and are based on your schema definitions.
- Schema configuration is simple without complex annotations.
- Types can be used in place of enum values.
- There's a consistent way to query, select, insert, update and delete making it easier to memorize.
Overall, it's a very intuitive ORM once you get the hang of it.
Prerequisites
If you don't already have a Next.js application set up, use the following command to generate a new project.
Create a Next.js Application
npx create-next-app@latest
The generator will prompt for some configuration details, I'll be using the following:
What is your project named? <your-project-name>
Would you like to use TypeScript? Yes
Would you like to use ESLint? Yes
Would you like to use Tailwind CSS? Yes
Would you like to use `src/` directory? No
Would you like to use App Router? (recommended) Yes
Would you like to customize the default import alias (@/*)? No
What import alias would you like configured? @/*
Once that completes, change directory into the new Next.js project folder.
cd <project-name>
Next, install the packages for the tutorial. I'll be using MySql Database for this example.
dependencies
npm i drizzle-orm@^0.32.1 @paralleldrive/cuid2@^2.2.2 mysql2@^3.10.1
devDependencies
npm i -D dotenv@^8.2.0 @faker-js/faker@^8.4.1 drizzle-kit@^0.24.0
TypeScript path alias
Also, the project generator will use the default path alias in the tsconfig.json file.
{
  "compilerOptions": {
    "paths": {
        "@/*": [
          "./*"
        ]
    }
  }
}
Create a new MySQL Database Schema
-
In order to connect with Drizzle we'll need to create a new database in the MySQL server and give it a name like drizzle-demo.
-
Also, create a new MySQL user with sufficient priviledges to update and modify the new schema.
-
Next, add the following environment entry to your .env.local file and just replace the values with your database connection details.
The DATABASE_URL environment key is formatted as follows mysql://[USER]:[PASSWORD]@[HOST]:[PORT]/[SCHEMA_NAME].
Here's an example using a database schema called drizzle-demo and simply connecting to localhost.
DATABASE_URL=mysql://joeadmin:password@localhost:3306/drizzle-demo
When deploying to a production env, the values should be changed to point to your remote database in the .env.production file.
Also, just remember to add these files to .gitignore and make sure they are not commited to git.
.gitignore sample
.env
.env.*
**/.env
**/.env.*
Getting started with Drizzle and Next.js
Now that everything is set up, let's add some of the files we'll need.
For this tutorial. Here's the directory structure for this tutorial:
Project structure
└── <project-root>
    ├── db
    │   ├── drizzle (out dir)
    │   ├── index.ts
    │   ├── schema.ts
    │   ├── seed.ts
    │   └── types.ts
    └── drizzle.config.ts
Create a Drizzle Configuration
Drizzle uses a single configuration file called drizzle.config.ts and is usually placed in the project directory.
- schema: Can be a directory, file or an array of paths that point to schema definitions. This is very flexible and allows for separation to better organize schema definitions.
- out: output directory for migrations or pull introspect and it's better to let Drizzle manage the output unless you're sure of what you're doing.
- dialect: database dialect of one of the following mysql, sqlite or postgresql
Note that the config is importing dotenv we installed earlier to set the proper environment values. This is important for migration rollouts.
import 'dotenv/config';
import { defineConfig } from 'drizzle-kit';

export default defineConfig({
  schema: './db/schema.ts',
  out: './db/drizzle',
  dialect: 'mysql',
  dbCredentials: {
    url: `${process.env.DATABASE_URL}`
  },
});
Designing the Drizzle Schema
The schema file(s) are where all of the table and relationship mappings will be defined.
Drizzle is very flexible and makes it easy to separate schema into multiple files as needed, for example:
- One schema file for everything.
- Split schema files for each table.
- Split table definitions and relationships for clarity.
- Split into different types, like ecommerce, admin or social.
For this example, I'll create the following tables in a single schema file.
- students
- courses
- studentProfiles
The tables will have the followig relationships:
- students to courses: Has a many-to-many mapping
- students to studentProfiles: Has a one-to-one mapping
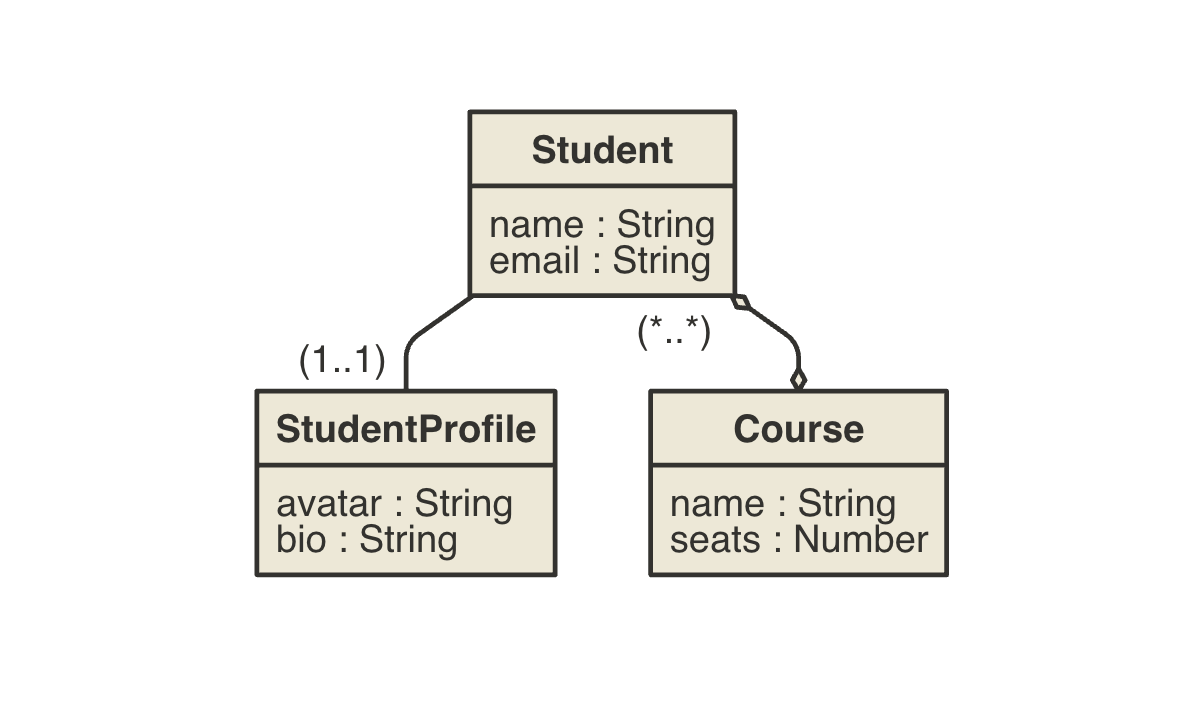
The tables will use a cuid for primary keys, which is now officially supported by Drizzle using the $defaultFn function. You could easily use uuid if you prefer.
If you choose to use int primary keys, consider using bigint in MySQL if you anticipate your table will grow to a large row count.
import {
  mysqlTable,
  primaryKey,
  varchar,
  longtext,
  int,
} from 'drizzle-orm/mysql-core';
import { relations } from 'drizzle-orm';
import { createId } from '@paralleldrive/cuid2';

export const students = mysqlTable('student', {
  id: varchar('id', { length: 128 })
    .primaryKey()
    .notNull()
    .$defaultFn(() => createId()),
  name: varchar('name', { length: 255 }).notNull(),
  email: varchar('email', { length: 255 }).notNull(),
});

export const courses = mysqlTable('course', {
  id: varchar('id', { length: 128 })
    .primaryKey()
    .notNull()
    .$defaultFn(() => createId()),
  name: varchar('name', { length: 255 }).notNull(),
  seats: int('seats').default(30),
});

export const courseRelations = relations(courses, ({ many }) => ({
  students: many(studentsToCourses),
}));

export const studentRelations = relations(students, ({ one, many }) => ({
  courses: many(studentsToCourses),
  profile: one(studentProfiles, {
    fields: [students.id],
    references: [studentProfiles.studentId],
  }),
}));

export const studentsToCourses = mysqlTable(
  'student_courses',
  {
    studentId: varchar('student_id', { length: 128 })
      .notNull()
      .references(() => students.id),
    courseId: varchar('course_id', { length: 128 })
      .notNull()
      .references(() => courses.id, {
        onDelete: 'cascade',
        onUpdate: 'cascade',
      }),
  },
  (t) => ({
    pk: primaryKey({ columns: [t.studentId, t.courseId] }),
  })
);

export const studentsToCoursesRelations = relations(
  studentsToCourses,
  ({ one }) => ({
    course: one(courses, {
      fields: [studentsToCourses.courseId],
      references: [courses.id],
    }),
    student: one(students, {
      fields: [studentsToCourses.studentId],
      references: [students.id],
    }),
  })
);

export const studentProfiles = mysqlTable('student_ profile', {
  id: varchar('id', { length: 128 })
    .primaryKey()
    .notNull()
    .$defaultFn(() => createId()),
  bio: longtext('bio'),
  avatar: varchar('avatar', { length: 255 }),
  studentId: varchar('student_id', { length: 128 }).references(
    () => students.id,
    {
      onDelete: 'cascade',
      onUpdate: 'cascade',
    }
  ),
});

export const studentProfileRelations = relations(
  studentProfiles,
  ({ one }) => ({
    student: one(students, {
      fields: [studentProfiles.studentId],
      references: [students.id],
    }),
  })
);
One thing that really helps in designing a drizzle schema is to use a consistent naming convention for tables and relationships.
Every table relationship has two sides and by naming things with a pattern it will help determine relations.
This will also define the query relations path as well see in the next section.
Here's a very useful naming convention:
| Type | Naming Convention |
|---|
| tables | Should use the plural form if possible, like users and courses. |
| relationships | Should use a suffix of [table]Relations in the plural form. |
| join tables | Should use the following [table1]To[table2] form, for example usersToCourses. |
| join table relationships | Should use a suffix of [joinTable]Relations in the plural form, for example studentsToCoursesRelations. |
An example of this is in the schema, where the students and courses tables have bi-directional relations pointing back to each other.
export const courseRelations = relations(courses, ({ many }) => ({
students: many(studentsToCourses),
}));
export const studentRelations = relations(students, ({ one, many }) => ({
courses: many(studentsToCourses),
profile: one(studentProfiles, {
fields: [students.id],
references: [studentProfiles.studentId],
}),
}));
Since they share a many-to-many relations to each other, they need to share a common join table to link the foreign keys of both tables.
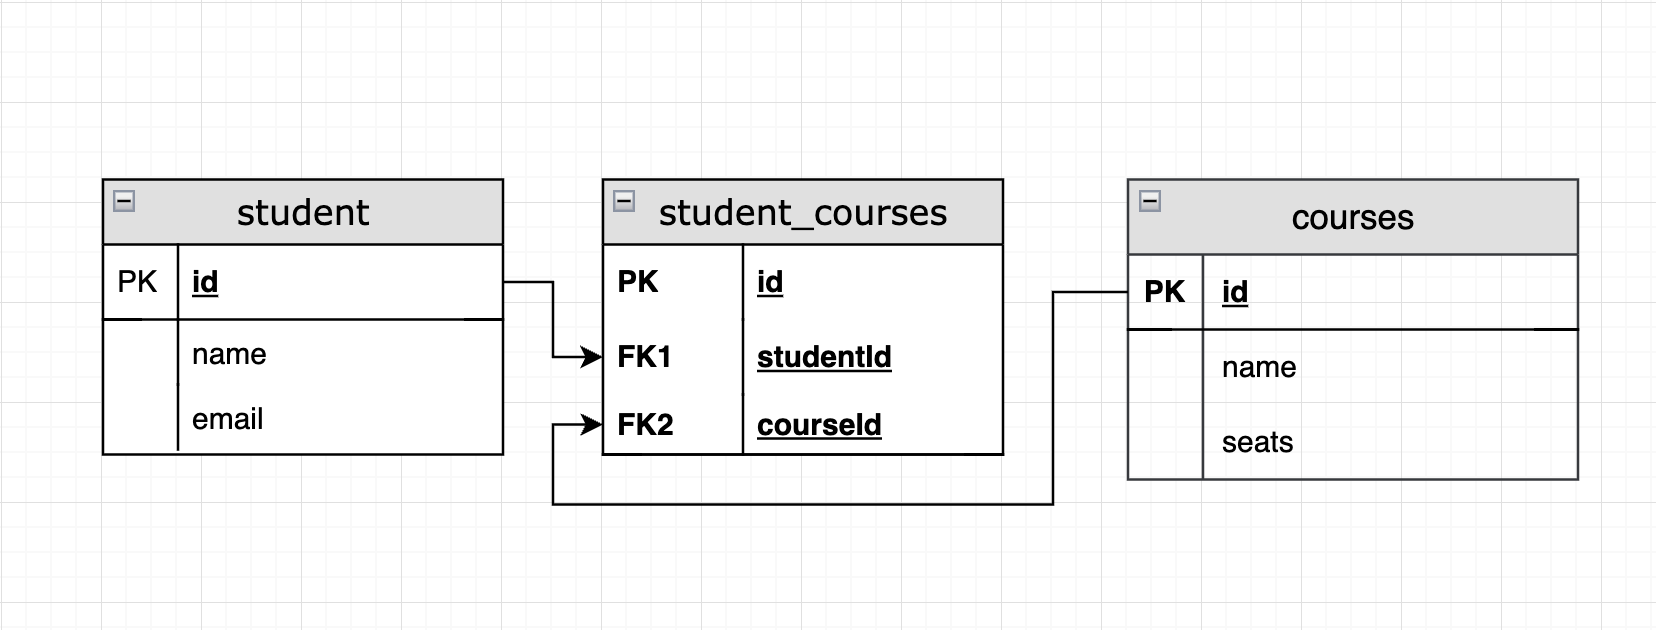
This join table is defined in the studentsToCourses table and it too has a studentsToCoursesRelations definition.
By defining a relations on the join table, it lets Drizzle know what relations are available to include in queries.
We'll see an example of this in the next section, in the client side of the tutorial.
Create Drizzle Type Models
One of the things that make Drizzle a little easier to manage is that there are really only two main types it will create based on the schema files.
These need to be manually created and exported using:
- $inferSelect: Defines a select type model return in query results.
- $inferInsert: Defines an insert type model for creating new rows.
import {
  courses,
  students,
  studentProfiles,
} from './schema';

export type Student = typeof students.$inferSelect;
export type StudentProfile = typeof studentProfiles.$inferSelect;
export type Course = typeof courses.$inferSelect;

export type NewStudent = typeof students.$inferInsert;
export type NewStudentProfile = typeof studentProfiles.$inferInsert;
export type NewCourse = typeof courses.$inferInsert;
Create a Drizzle Database Connection
It's a little easier to create an index.ts for exporting the database connection rather than including it in the same schema module. This way any schema modules can be passed directly into the connection builder function.
Note: If the schema modules are not set in the schema field when creating the connection, they will not be available when running query operations. You can still use select but query needs to have a reference to the schema exported tables and relations.
A couple things to note, include:
- Adjust the connection details here if you plan to use a different database.
- Import and add any schema modules to the connection
schema field using an array.
import { drizzle } from 'drizzle-orm/mysql2';
import mysql from 'mysql2/promise';
import * as schema from './schema';

export * from './types';

const poolConnection = mysql.createPool(`${process.env.DATABASE_URL}`);

export const db = drizzle(poolConnection, {
  schema: [schema],
  mode: 'default',
});
Now the query operator will have a reference to schema, for example:
import {db} from '@/db';

const results = await db.query.students(...);
const results = await db.query.courses(...);
Also the types are now available when creating new entities.
import {db, NewStudent} from '@/db';

const newStudent: NewStudent = {
  name: 'Joe',
  email: 'joe@example.com'
}

const resultId = await db.insert(users).values(newStudent).$returningId();
Drizzle Migration and Initialization
So now that we have all of the configuration and schema in place, let's create the first drizzle migration to initialize the database.
For local development, the push command can be used directly to create all the schema tables.
npx drizzle-kit push
However, if you're planning to deploy this to a production server, there should be a migration history to keep local and remote schema tables in sync.
Adding some helper scripts
Sometimes it's helpful to add some helper scripts to call the underlying drizzle-kit commands.
 {
   "scripts": {
    "db:push": "drizzle-kit push --config=./drizzle.config.ts",
    "db:generate": "drizzle-kit generate",
    "db:migrate": "drizzle-kit migrate",
    "db:seed": "tsx ./db/seed.ts",
    "db:studio": "drizzle-kit studio"
   }
 }
Generate the first migration
Using the db:generate script command and passing a --name argument will create the first migration inside of the /db/drizzle directory.
npm run db:generate -- --name initialize
Now that the first migration is added, use the db:migrate command to push the new schema to the database.
npm run db:migrate
This command will install all of the schema tables with the addition of a table called __drizzle_migrations. The migrate command will use this table to orchestrate synchonizing the changes.
Any time you need to make any changes to the schema, just run the db:generate script and give it a name to identify the changes and then run db:migrate to push the updates.
Note: Make sure to commit any of these changes so they are not lost and can be applied to production when deploying.
Seeding the database
Seeding is an important step in development and will provide your database with some useful data to develop against.
Add the following seed code to generate some students and courses. This will also give some idea how to insert relationship data which can be a little tricky at first.
import { faker } from '@faker-js/faker';
import { db, NewCourse, NewStudent, NewStudentProfile } from '@/db';
import {
courses,
studentProfiles,
students,
studentsToCourses,
} from './schema';
async function main() {
console.log(`Start seeding ...`);
const courseNames = [
'Finance',
'History 1A',
'History 1B',
'Economics',
'Computer Science',
'JavaScript Intro',
'Advanced React',
'Node.js Intro',
'Python AI',
'Ecommerce',
];
const courseNameInserts: NewCourse[] = courseNames.map((c) => ({
name: c,
}));
const courseResultIds = await db
.insert(courses)
.values(courseNameInserts)
.$returningId();
const randomStudents: NewStudent[] = [];
for (let i = 0; i < 50; i++) {
const randomEmail = faker.internet.email();
let fullName = randomEmail.split('@')[0].replace(/(_|\.)/, ' ');
randomStudents.push({
name: fullName,
email: randomEmail.toLocaleLowerCase(),
});
}
const randomStudentResultIds = await db
.insert(students)
.values(randomStudents)
.$returningId();
for (let i = 0; i < randomStudentResultIds.length; i++) {
const nextId = randomStudentResultIds[i].id;
await db.insert(studentsToCourses).values({
studentId: nextId,
courseId: courseResultIds[Math.floor(Math.random() * 10)].id,
});
await db.insert(studentProfiles).values({
studentId: nextId,
bio: faker.lorem.paragraphs()
} as NewStudentProfile);
}
console.log('Seeding finished...');
process.exit(0);
}
console.log('Starting drizzle seed...');
main().catch((e) => {
console.error(e);
process.exit(0);
});
Save the code and run the following command to seed the database.
npm run db:seed
Drizzle Studio
Drizzle has a Studio application that can be started to view all of the database tables and data.
npm run db:studio
Once it's running you'll see a link to open Drizzle Studio.
Drizzle Studio is up and running on https://local.drizzle.studio
Drizzle Studio is a great tool since it will also show relationship data which is useful for development. You can also run and execute select statements.
Building the Next.js client
So now that all of the database and seeding is completed, we can focus on creating a few pages using the app router to access and view the data, including:
- Students and Course listings
- Student and Course details
- Students and Course services
Here's the project structure of the client pages we'll be creating.
Nextjs client directory structure
└── <project-root>
    ├── app
    │    ├── demo
    │    │   ├── students
    │    │   │   ├── page.tsx
    │    │   │   └── [id]
    │    │   │       └── page.tsx
    │    │   └── courses
    │    │       ├── page.tsx
    │    │       └── [id]
    │    │           └── page.tsx
    │    └── layout.tsx
    └── lib
         └── service
             ├── courses.ts
             └── students.ts
Student and Course Services
Let's start off with creating some services to access the database. These will just be standard async functions that can be used in RSC components on the server side.
Here's the service to access students data.
import { db } from '@/db';
import { students, studentsToCourses, studentProfiles } from '@/db/schema';
import { eq } from 'drizzle-orm';

export async function findStudents() {
  try {
    const students = await db.query.students.findMany();
    return students;
  } catch (e: unknown) {
    return [];
  }
}

export async function findStudentById(studentId: string) {
  try {
    const student = await db.query.students.findFirst({
      with: {
        profile: true,
      },
      where: eq(students.id, studentId),
    });
    return student;
  } catch (e: unknown) {
    return undefined;
  }
}

export async function findStudentsByCourseId(courseId: string) {
  try {
    const students = await db.query.studentsToCourses.findMany({
      with: {
        student: true,
      },
      where: eq(studentsToCourses.courseId, courseId),
    });
    return students.map((sc) => ({ ...sc.student }));
  } catch (e: unknown) {
    return [];
  }
}

export async function findCoursesByStudentId(studentId: string) {
  try {
    const courses = await db.query.studentsToCourses.findMany({
      with: {
        course: true,
      },
      where: eq(studentsToCourses.studentId, studentId),
    });
    return courses.map((sc) => ({ ...sc.course }));
  } catch (e: unknown) {
    return [];
  }
}

export async function findStudentProfile(studentId: string) {
  try {
    const profile = await db.query.studentProfiles.findFirst({
      where: eq(studentProfiles.studentId, studentId),
    });
    return profile;
  } catch (e: unknown) {
    return undefined;
  }
}
And here's the service to access the courses data.
import { db } from '@/db';
import { courses } from '@/db/schema';
import { eq } from 'drizzle-orm';

export async function findCourses() {
  try {
    const courses = await db.query.courses.findMany();
    return courses;
  } catch (e: unknown) {
    return [];
  }
}

export async function findCourseById(courseId: string) {
  try {
    const course = await db.query.courses.findFirst({
      where: eq(courses.id, courseId),
    });
    return course;
  } catch (e: unknown) {
    return undefined;
  }
}
Modify the app layout
The layout adds some navigation links for the top of the page and imports the global.css Tailwind CSS file that comes with Next.js generator.
import type { Metadata } from "next";
import Link from 'next/link';
import { Inter } from "next/font/google";
import "./globals.css";

const inter = Inter({ subsets: ["latin"] });

export const metadata: Metadata = {
  title: "Drizzle Demo",
  description: "Drizzle client example of accessing data",
};

export default function RootLayout({
  children,
}: Readonly<{
  children: React.ReactNode;
}>) {
  return (
    <html lang="en">
      <body className={inter.className}>
        <div>
          <div className="flex justify-evenly p-5 bg-gray-100 text-lg font-bold">
            <Link href="/demo/students">Students</Link>
            <Link href="/demo/courses">Courses</Link>
          </div>
          {children}
        </div>
      </body>
    </html>
  );
}
Student and Course listing pages
These two pages will query the student and course data that was seeded earlier and provide a main listing.
Student listing page view:
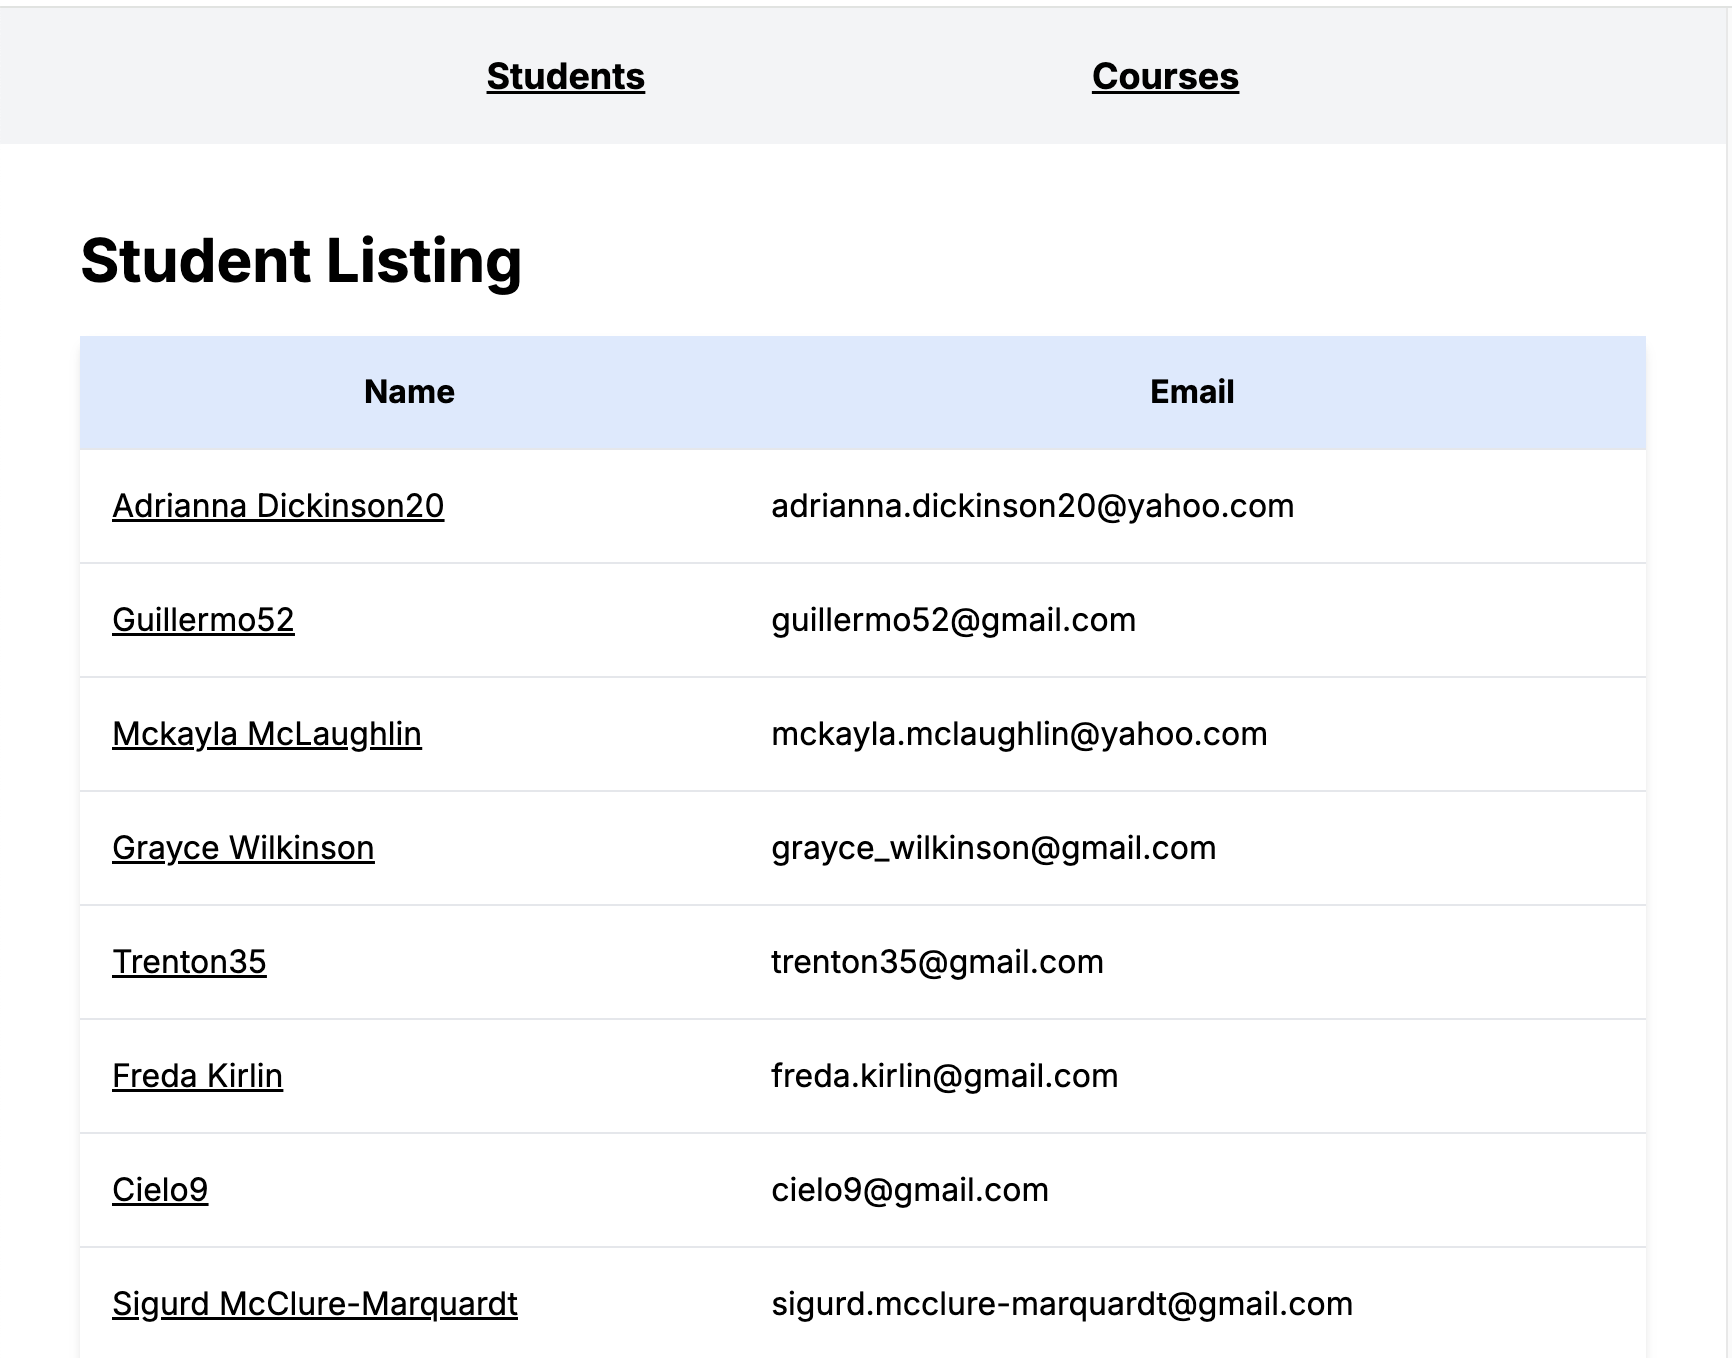
import { findStudents } from '@/lib/service/students';
import Link from 'next/link';

export default async function Page() {
  const students = await findStudents();

  return (
    <div className="flex-col space-y-5 p-10">
      <h2>Student Listing</h2>
      <table className="table-auto w-full shadow-md rounded-md">
        <thead>
          <tr className="bg-blue-100">
            <th className="p-4 font-bold">Name</th>
            <th className="p-4 font-bold">Email</th>
          </tr>
        </thead>
        <tbody>
          {students.map((student, i) => {
            return (
              <tr key={`${student.id}-${i}`}>
                <td className="border-t p-4"><Link href={`/demo/students/${student.id}`}>{student.name}</Link></td>
                <td className="border-t p-4">{student.email}</td>
              </tr>
            );
          })}
        </tbody>
      </table>
    </div>
  );
}
Course listing page view:
import { findCourses } from '@/lib/service/courses';
import Link from 'next/link';

export default async function Page() {
  const courses = await findCourses();

  return (
    <div className="flex-col space-y-5 p-10">
      <h2>Course Listing</h2>
      <table className="table-auto w-full shadow-md rounded-md">
        <thead>
          <tr className="bg-blue-100">
            <th className="p-4 font-bold">Name</th>
          </tr>
        </thead>
        <tbody>
          {courses.map((course, i) => {
            return (
              <tr key={`${course.id}-${i}`}>
                <td className="border-t p-4">
                  <Link href={`/demo/courses/${course.id}`}>{course.name}</Link>
                </td>
              </tr>
            );
          })}
        </tbody>
      </table>
    </div>
  );
}
Student and Course detail pages
Both of listing pages will provide links to access the details by using the table id field.
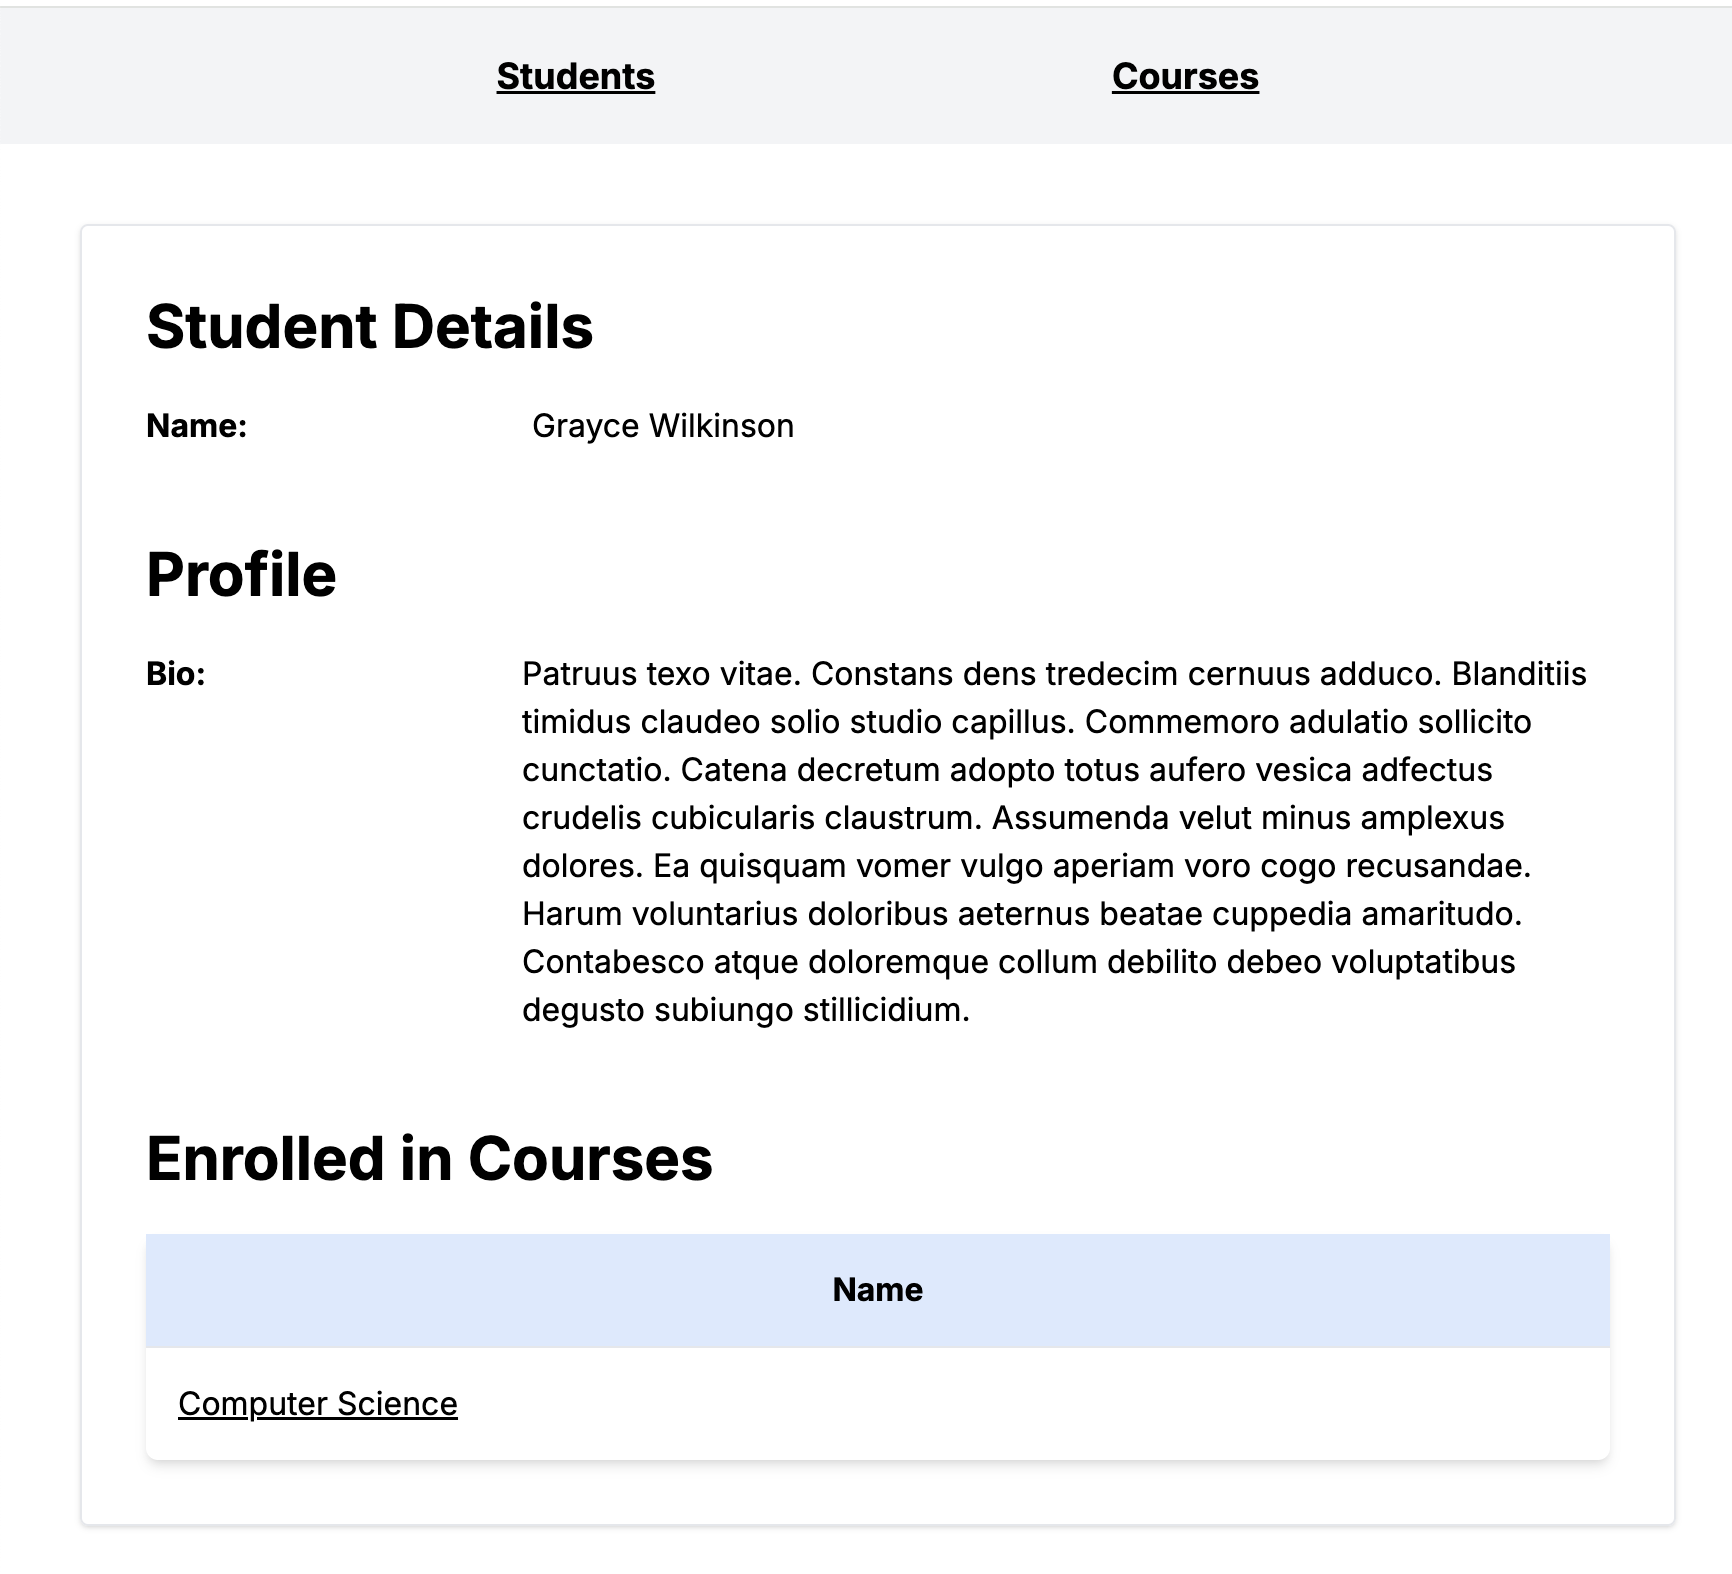
Student detail page view:
import {
  findCoursesByStudentId,
  findStudentById,
} from '@/lib/service/students';
import Link from 'next/link';

export default async function Page({
  params: { id },
}: {
  params: { id: string };
}) {
  const student = await findStudentById(id);

  const courses = student ? await findCoursesByStudentId(student.id) : [];

  return (
    <div>
      <div className="flex-col space-y-5 p-10">
        <div className="border border-gray-200 flex flex-col items-stretch rounded shadow">
          <div className="p-3">
            {student ? (
              <div className="flex flex-col p-5 space-y-5">
                <h2>Student Details</h2>
                <div className="w-1/2 grid grid-cols-2 gap-5">
                  <div className="font-bold">Name:</div>
                  <div>{student.name}</div>
                </div>
                <br/>
                <h2>Profile</h2>
                <div className="grid grid-cols-12 gap-5">
                  <div className="col-span-3 font-bold">Bio:</div>
                  <div className="col-span-9">{student?.profile?.bio}</div>
                </div>
                <br/>
                <h2>Enrolled in Courses</h2>
                {courses && (
                  <div className="w-full">
                    <table className="table-auto w-full shadow-md rounded-md">
                      <thead>
                        <tr className="bg-blue-100">
                          <th className="p-4 font-bold">Name</th>
                        </tr>
                      </thead>
                      <tbody>
                        {courses.map((course, i) => {
                          return (
                            <tr key={`${course.id}`}>
                              <td className="border-t p-4">
                                <Link href={`/demo/courses/${course.id}`}>
                                {course.name}
                                </Link>
                              </td>
                            </tr>
                          );
                        })}
                      </tbody>
                    </table>
                  </div>
                )}
              </div>
            ) : (
              <div>Student not found</div>
            )}
          </div>
        </div>
      </div>
    </div>
  );
}
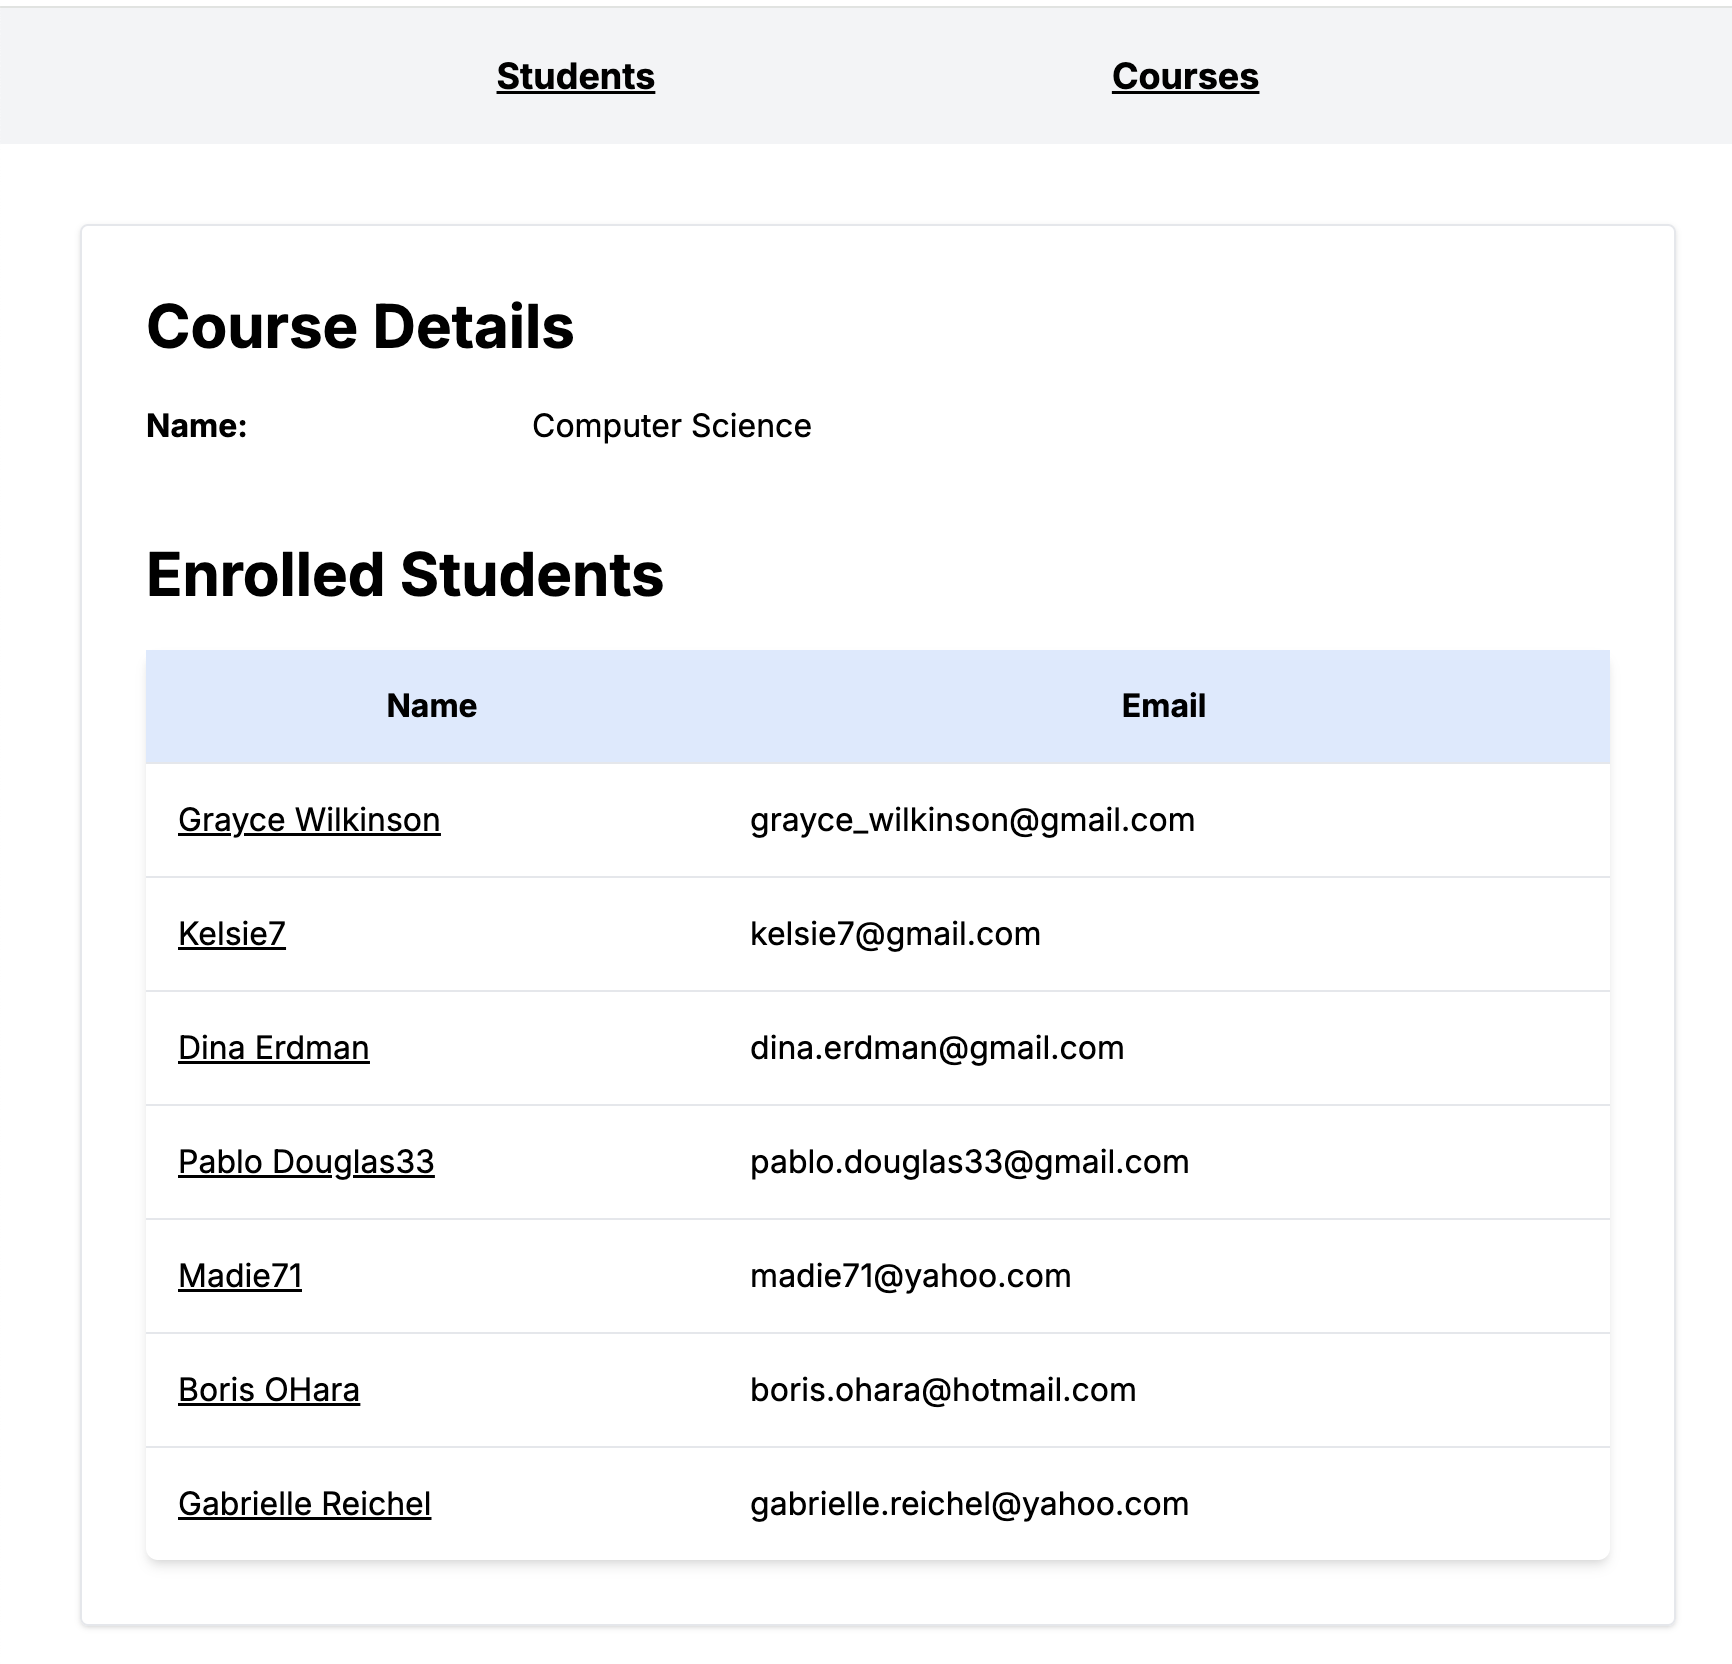
Course detail page view:
import { findCourseById } from '@/lib/service/courses';
import { findStudentsByCourseId } from '@/lib/service/students';
import Link from 'next/link';

export default async function Page({
  params: { id },
}: {
  params: { id: string };
}) {
  const course = await findCourseById(id);

  const students = course ? await findStudentsByCourseId(course.id) : [];

  return (
    <div>
      <div className="flex-col space-y-5 p-10">
        <div className="border border-gray-200 flex flex-col items-stretch rounded shadow">
          <div className="p-3">
            {course ? (
              <div className="flex flex-col p-5 space-y-5">
                <h2>Course Details</h2>
                <div className="w-1/2 grid grid-cols-2 gap-5">
                  <div className="font-bold">Name:</div>
                  <div>{course.name}</div>
                </div>
                <br/>
                <h2>Enrolled Students</h2>
                {students && (
                  <div className="w-full">
                    <table className="table-auto w-full shadow-md rounded-md">
                      <thead>
                        <tr className="bg-blue-100">
                          <th className="p-4 font-bold">Name</th>
                          <th className="p-4 font-bold">Email</th>
                        </tr>
                      </thead>
                      <tbody>
                        {students.map((student, i) => {
                          return (
                            <tr key={`${student.id}-${i}`}>
                              <td className="border-t p-4">
                                <Link href={`/demo/students/${student.id}`}>
                                {student.name}
                                </Link>
                              </td>
                              <td className="border-t p-4">{student.email}</td>
                            </tr>
                          );
                        })}
                      </tbody>
                    </table>
                  </div>
                )}
              </div>
            ) : (
              <div>Course not found</div>
            )}
          </div>
        </div>
      </div>
    </div>
  );
}
Running the Next.js client pages
Now that all of the pages are in place, the Next.js app can be started to view the pages.
Start Next.js and point your browser to localhost:3000/students.
npm run dev
In Conclusion
So now that we've seen how to not only setup Drizzle but also run several SQL commands to access the database, this should provide a good idea how to use it in your own Next.js project going forward.
After converting a couple apps over to Drizzle, it has become one of my go to database ORMs of choice. It has really brought a lot of flexibility into the mix. Drizzle definitely makes it a little easier to maintain and deploy as well.
I hope this has helped and was informative.