How To Install and Host Next.js With cPanel

If you're developing Next.js web applications, you might be considering what options are available for hosting. Is it really necessary to host in the Cloud or can you host on traditional Shared or VPS hosting solutions?
Surprisingly, I found that Shared and VPS hosting services offer a great way to install and host applications using Next.js with cPanel.
In this article I'll show how to easily install and host a Next.js application on a Shared hosting provider, including:
- How to create a Node.js app using cPanel for your domain
- How to manage Node.js versions
- Create, build and deploy a Next.js application
- How to use SSH to run NPM processes like a pro
What is Next.js Shared or VPS Hosting
Most websites and blogs these days are usually PHP based sites that use Shared or VPS hosting plans.
Since Next.js is a React based framework it requires a Node.js environment to run and host a React based web application. The good news is that most Shared and VPS hosting services support Node.js these days.
Why install Next.js on Shared or VPS Hosting?
There's a lot of advantages to using traditional hosting, including:
- More affordable budget for sites just starting out
- Moving to the cloud can require more complex setup and knowledge, where Shared and VPS hosting providers have everything ready to go to get up and running quickly.
- A wide range of services in cPanel.
- Most developers are familiar with cPanel and configuring services.
Next.js is a highly performant framework for building next generation web applications and can serve static or server side rendered HTML payloads in most cases making it highly optimal for SEO performance and ranking.
Requirements to Install Next.js
For this article, you need access to the following:
- A hosting provider that supports Node.js in cPanel, in this tutorial I'm using A2 Hosting which uses CloudLinux Node.js services but any provider should be relatively similar using cPanel.
- Admin access to cPanel and hosting information for SSH, FTP and SFTP access.
Step 1 Create a Node.js Application
The first step is to create a new Node.js application using the cPanel Node.js Application Manager.
-
Log into cPanel and scroll down to the > Tools > Software section
-
Select the Setup Node.js App link.

- This will take you to a page listing all of your applications. The table will be empty if you don't have any applications created yet. Click on the Create Application button.

- Fill in the form with information about your site. I will use the
example.com placeholder to illustrate how to use an actual registered domain name and also replace username with your actual username.
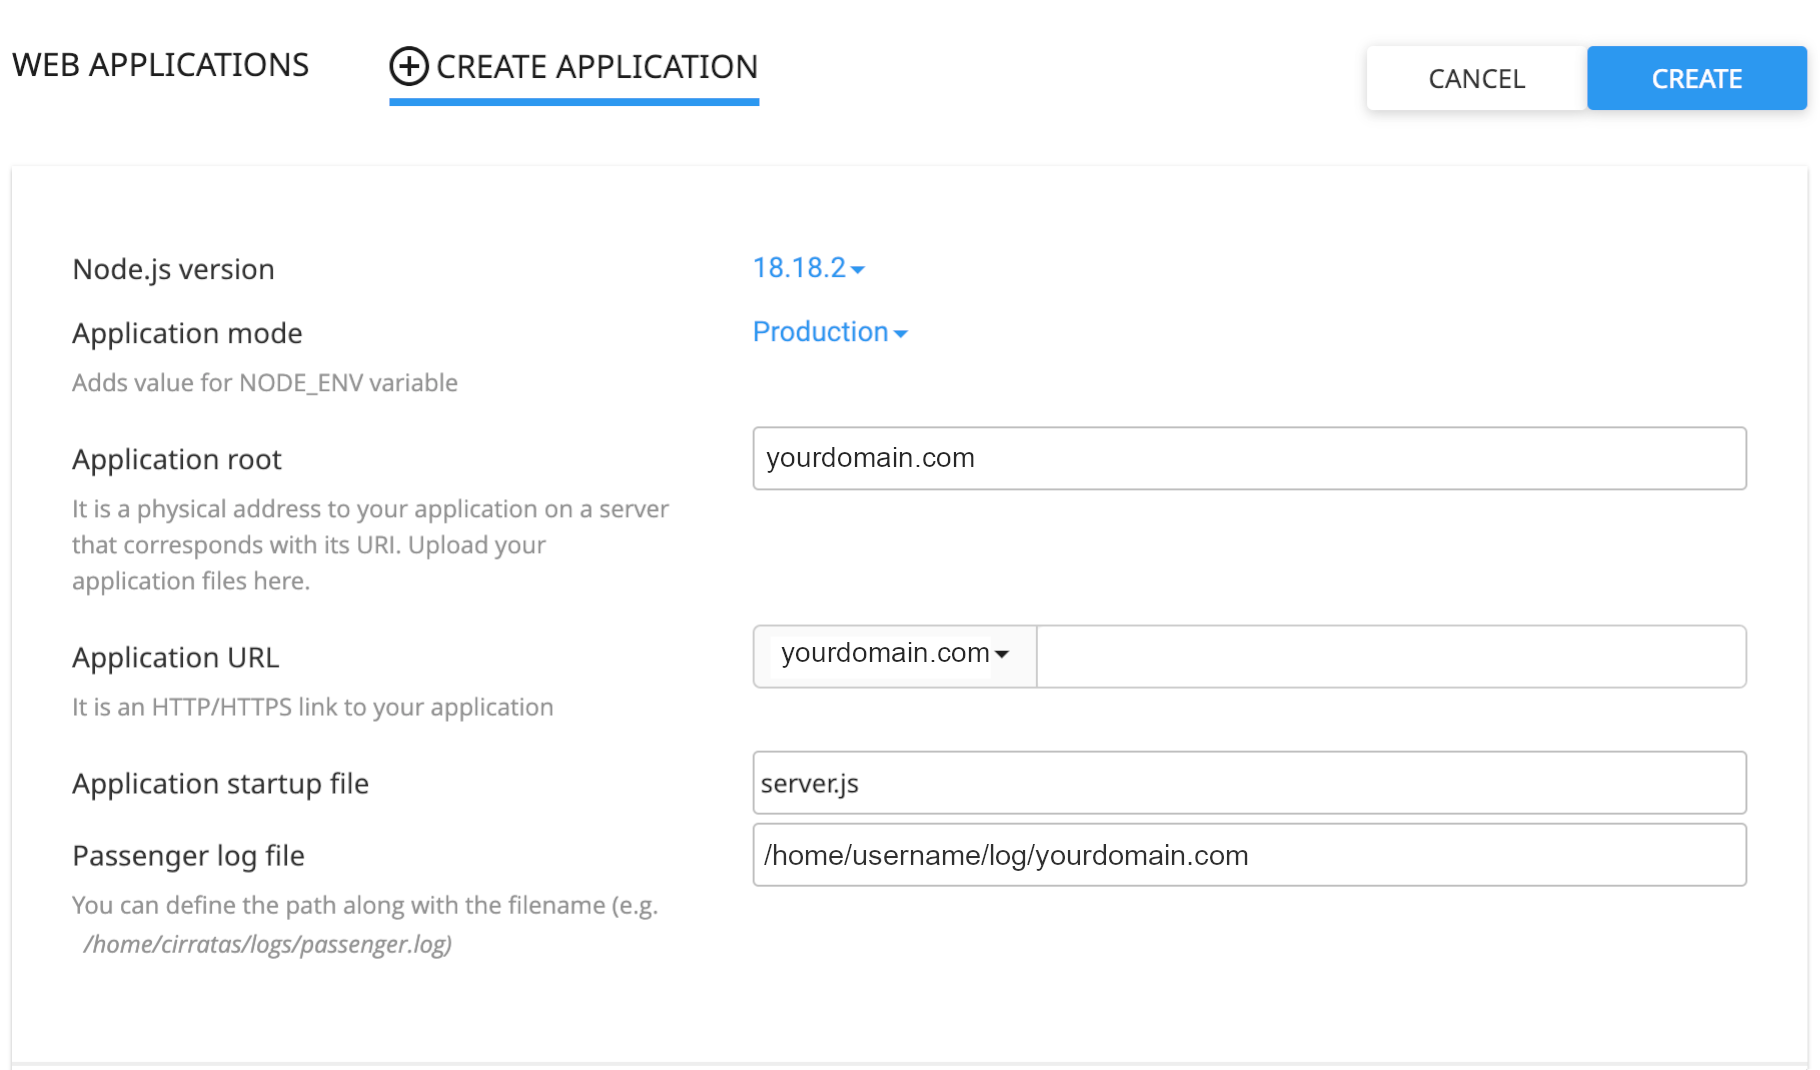
Here's some details on what these fields are used for.
-
Node.js version: I would recommend setting the node version to at least v18, since earlier versions <= v14 are not maintained by Node.js any longer. Also, setting v18 will use a higher version of npm. However, pick the version that your application requires.
-
Application mode: This is the value of the process.env.NODE_ENV that a Node.js might use for configuration.
-
Application root: This is the folder where the application code will be located. I typically use the domain name for this folder name, in this case example.com but it can be any directory name. This directory is not automatically created, so it will have to manually be added. Generally, I use the home directory on the server. For example, /home/username/example.com.
-
Application URL: Select one of the available registered domain names from the drop down menu. Generally you can leave the second text box empty, unless you want to have an application context path. For example, adding /blog will append to the domain as example.com/blog. This will be the url to access the new application.
-
Application startup file: Set this value to server.js for now because we're going to create this file in following section. This will be the file that Node.js will execute when starting your application.
-
Passenger log file: This is the log file location for all of the log and error outputs.
Press the Create button to create the application. The new application will now show in Web Applications tab.
Step 2 Creating a Next.js Application
Now, let's create a Next.js application that we can use to install and run.
Let's create the application locally and then we'll zip it up and upload it to the remote server under the directory we designated in the Application root setting in the previous section.
Run the following command in a terminal to generate a new Next.js application.
npx create-next-app@latest
Currently the create-next-app@latest is at version 14.x.x and requires at least Node.js v18.17 or later
It will prompt for some user input. Let's give it a project name of demo-app for now. Just accept all of the remaining prompts using defaults for now or select the options you prefer.
What is your project named? demo-app
Would you like to use TypeScript? No / Yes
Would you like to use ESLint? No / Yes
Would you like to use Tailwind CSS? No / Yes
Would you like to use `src/` directory? No / Yes
Would you like to use App Router? (recommended) No / Yes
Would you like to customize the default import alias (@/*)? No / Yes
What import alias would you like configured? @/*
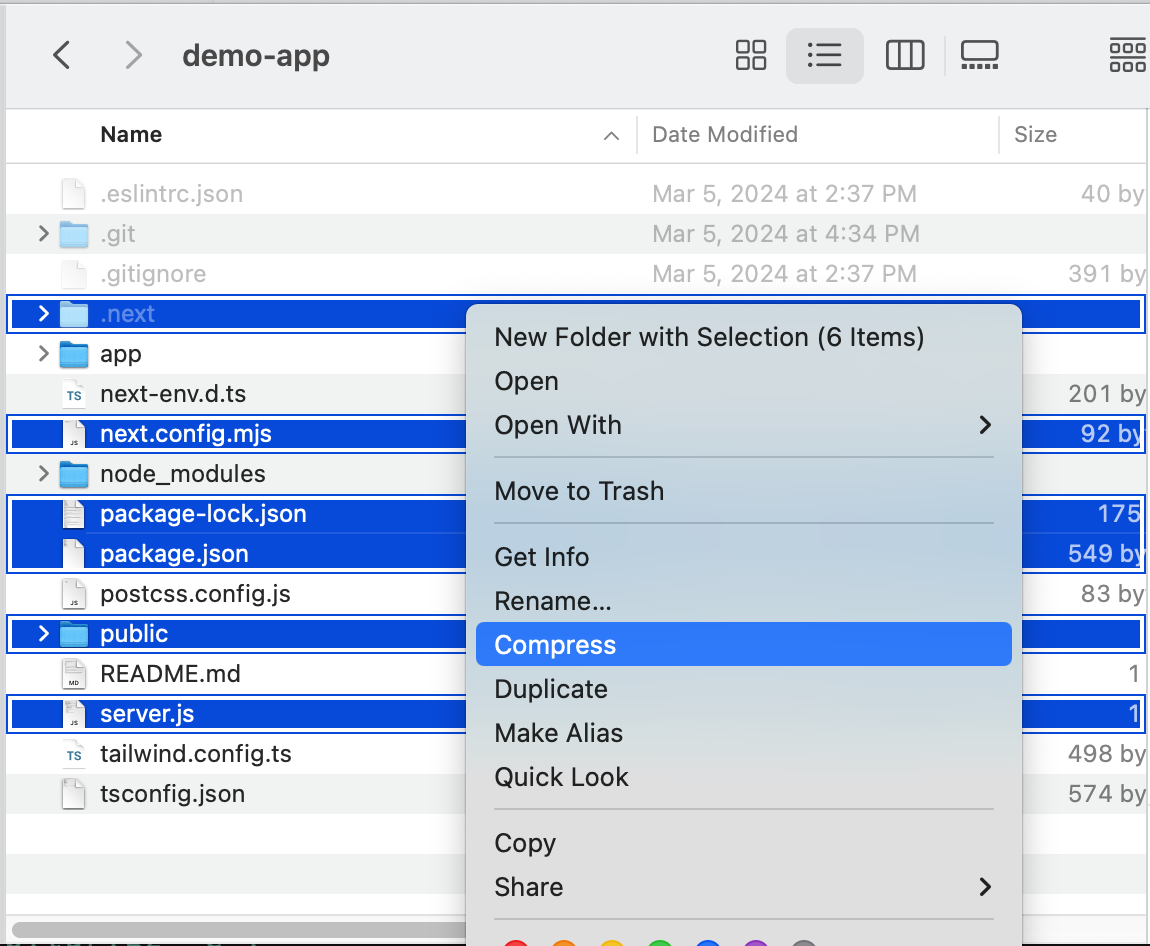
Once this completes, the Next.js application will be ready and there will be a new directory demo-app with the following contents.
├── .eslint.json
├── .gitignore
├── app
├── next-env.d.ts
├── next.config.mjs
├── node_modules
├── package.json
├── package-lock.json
├── postcss.config.js
├── public
├── README.md
├── tailwind.config.ts
└── tsconfig.json
Step 3 Create the startup file
As I mentioned earlier, we'll need to add a startup.js file in the root of the project directory.
The Node.js application in cPanel will execute this file to start the server.
It's recommended not to use package.json script tasks to start and stop the Node.js server.
Using a server.js file gives that control over to the Node.js Application Manager to start and stop the application.
You can think of it as running Node.js the traditional way.
node server.js
To create the startup.js file enter the following command inside the demo-app directory.
touch server.js
Copy this custom server code into the server.js file and save it.
This is the recommended sample code from the Next.js team. You can further customize it as needed but this is usually sufficient.
server
const { createServer } = require('http')
const { parse } = require('url')
const next = require('next')
const dev = process.env.NODE_ENV !== 'production'
const hostname = 'localhost'
const port = 3000
const app = next({ dev, hostname, port })
const handle = app.getRequestHandler()
app.prepare().then(() => {
createServer(async (req, res) => {
try {
const parsedUrl = parse(req.url, true)
const { pathname, query } = parsedUrl
if (pathname === '/a') {
await app.render(req, res, '/a', query)
} else if (pathname === '/b') {
await app.render(req, res, '/b', query)
} else {
await handle(req, res, parsedUrl)
}
} catch (err) {
console.error('Error occurred handling', req.url, err)
res.statusCode = 500
res.end('internal server error')
}
})
.once('error', (err) => {
console.error(err)
process.exit(1)
})
.listen(port, () => {
console.log(`> Ready on http://${hostname}:${port}`)
})
});
You'll find it's easier to just check this file into your code repo and just make sure to always include it when deploying.
Step 4 Deploying the Next.js application
The first thing to do is build the Next.js application
cd demo-app

npm run build
This will create an optimized build for a production deployment and create a new directory named .next which is were all of the bundled code is located.
Once the build is done, we'll need to upload the files to the remote server.
You could use a utility like FileZilla or SFTP if you prefer. For this step, I'm just going to zip up the contents and use cPanel File Manager to move the files.
Here are the only resources we'll need to upload to the remote server:
├── .next
├── next.config.mjs
├── package.json
├── package-lock.json
├── public
└── server.js
There's no need to include node_modules since we'll need to run the install process once the code is uploaded on the remote server.
You can use whatever utility for compressing the files. I'm just using the built-in compression tool in Mac to select and zip these files.
Now, just upload the zip (or tar) file to the /home/username/example.com directory on the remote server.
Step 5 Install the Next.js application
As a good practice, it's always best to stop your Node.js application in the Node.js Application Manager if it's running and restart it after a successful install.
Also, you'll want to make sure the directory is empty before deploying new content.
As you rollout and deploy more changes, it's a good practice to make a backup of the previous contents of this directory for a rollback restore point if there are any unforseen issues.
Example of a rollback zip/tar file demo-app--rollback-4-4-2024.zip
Extract the new content into the clean Application root directory /home/username/example.com.
The directory should now have the following content.
└── example.com
    ├── .next
    ├── next.config.mjs
    ├── package.json
    ├── package-lock.json
    ├── public
    └── server.js
Now, the npm install can be ran so all of the node_modules are available. There's a couple options on how to run this command.
- Use the cPanel
Node.js Application Manager interface
- Use an SSH terminal session (Recommended)
Running NPM install in cPanel
You can run the install process in the cPanel Node.js Application Manager interface by clicking the Edit link. You'll see the following screen to start the install process.

Running NPM install using SSH
I highly recommend running npm install from the command line using an SSH configured connection to your remote server.
If your hosting provider is running CloudLinux Node.js, you'll need to run the following command to activate the nodeenv for the session. This just makes sure the npm command is available in your SSH session terminal.
Just replace the username and example.com with your account details.
SSH terminal session
source /home/username/nodevenv/example.com/18/bin/activate && cd /home/username/example.com
The Node.js Application Manager interface provides a copy link on the Edit page for these commands to activate nodeenv.
Now you can use npm commands as you normally do on your local development.
npm install
Just for reference I'm including some additional npm install flags that you might need to use at times if the install hangs or fails.
At a bare minimum I always run npm install --omit=optional since certain binaries are usually blocked by networks for security reasons.
npm install --omit=optional
npm install --legacy-peer-deps
npm install --force
It's very important to get a successful npm install before proceeding, otherwise you may see "Module not found issues" or you won't be able to start your application successfully.
Starting the Node.js Application
Now that the code has been deployed and all the packages are now installed, we are ready to start up the application.
On the Edit page of Node.js Application Manager interface, you'll see the start button.

Once the application starts, open a new browser window and point to your domain url and you will see the running demo-app Next.js application.
That's it! Pretty easy to get your Next.js applications up and running on Shared or VPS hosting services.
Overview of Node.js and CloudLinux
Some hosting providers use CloudLinux behind the scenes to virtually manage all of the Node.js applications in cPanel. This section will cover some details about the nodeenv environment when using command line, such as:
- How
nodeenv manages different Node versions.
- How
nodeenv manages node_modules.
- How
package.json and package-lock.json referenced.
Hopefully this section will help to avoid any downtime because of deployment issues. By following some basic guidelines, you'll be able to easily deploy with confidence.
Since these environments are usually virtual, running NPM processes is not like normal NPM operations on local environments.
Linking the Node.js Environment
When we ran the following command earlier to link and activate the nodeenv when using a SSH to do the npm install, it does a couple things behind the scenes worth mentioning.
If you follow the source path, it links to the nodeenv directory under the /home/username directory, where cPanel Node.js adds all of the Node.js and npm executables.
username: Your account usernameexample.com: This is the path to your Application root we set earlier when creating a Node.js application.
source /home/username/nodevenv/example.com/18/bin/activate && cd /home/username/example.com
Since we've set the Node.js version to v18.18.2 when we created the application earlier, it will do the following:
- Adds a
version folder (i.e. example.com/18).
- creates a subdirectory for
bin binaries.
- creates a subdirectory for
lib which is where node_modules is actually located.
Since we only created one nodeenv for Node.js version 18, we should see the following.
└── nodeenv
└── example.com
└── 18
├── bin
│ ├── activate
│ ├── node
│ ├── npm
│ └── set_env_vars.py
└── lib
├── node_modules (link)
├── package.json (link /home/username/example.com/package.json)
└── package-lock.json (link /home/username/example.com/package-lock.json)
After running the npm install process, you'll see that it added a node_modules symlink to the application root directory /home/username/example.com.
It also added symlinks to the package.json and package-lock.json files.
└── example.com
    ├── .next
    ├── next.config.mjs
    ├── node_modules (link ~/nodevenv/example.com/18/lib/node_modules)
    ├── package.json
    ├── package-lock.json
    ├── public
    └── server.js
One thing to keep in mind is that everytime you run the npm install command it will reestablish this linking.
As most Javascript Node.js developers know, sometimes you may need to remove the node_modules and reinstall for various reasons. The best place to do this is in the lib directory.
To avoid any downtime, here's a few suggestions when running the install process:
- Don't remove
node_modules unless absolutely necessary since it can be quite large and use up metered system bandwidth resources to reinstall.
- Use a
package-lock.json that is in sync with the package.json when deploying new changes.
- Only deploy incremental package changes in
package.json, this way the install process will only update whats needed.
General guidelines using Node.js in cPanel
As a general rule of thumb and to avoid any issues, I recommend to follow some simple guidelines.
└── nodeenv
    └── example.com
        └── 18
            ├── bin
            └── lib
- bin: Should not be removed or changed manually ever, let the cPanel Node.js application maintain this directory based on your application settings.
- lib: Anything inside this directoy can be removed as needed for development needs but always make sure to run
npm install after any changes to reinstall and reestablish the symlinks to node_modules.
Trying to remove the node_module symlink in the actual Application root directory is not the same and will just break the link and leave your application without a way to resolve npm modules.
So if you keep these basic guidelines in mind, you should have a great experience setting up multiple Node.js apps running Next.js under one domain or subdomains if needed.
Conclusion
I hope this article has provided some useful information on how to host Next.js applications using traditional hosting providers. Moving to a cloud platform is really going to be based on your application and business requirements.
The other aspect is that you would need a fair amount of DevOps and Cloud Engineering experience to even setup all of the services needed, where a traditional hosting solution is quickly manageable using cPanel.
So there will be some tradeoffs here and there but at least you have some alternative options.